<?xml version="1.0" encoding="UTF-8"?>
<feed xmlns="http://www.w3.org/2005/Atom" xml:lang="">
                        <id>https://mobidonia.support-hub.io/feed/122</id>
                                <link href="https://mobidonia.support-hub.io/feed/122" rel="self"></link>
                                <title><![CDATA[Full Mobile  Shop app - React Native Article Feed]]></title>
                    
                                <subtitle></subtitle>
                                                    <updated>2019-01-29T12:33:35+00:00</updated>
                        <entry>
            <title><![CDATA[Adding your categories]]></title>
            <link rel="alternate" href="https://mobidonia.support-hub.io/articles/adding-your-categories" />
            <id>https://mobidonia.support-hub.io/132</id>
            <author>
                <name><![CDATA[Daniel Dimov]]></name>
            </author>
            <summary type="html">
                <![CDATA[<p><br /></p><p>
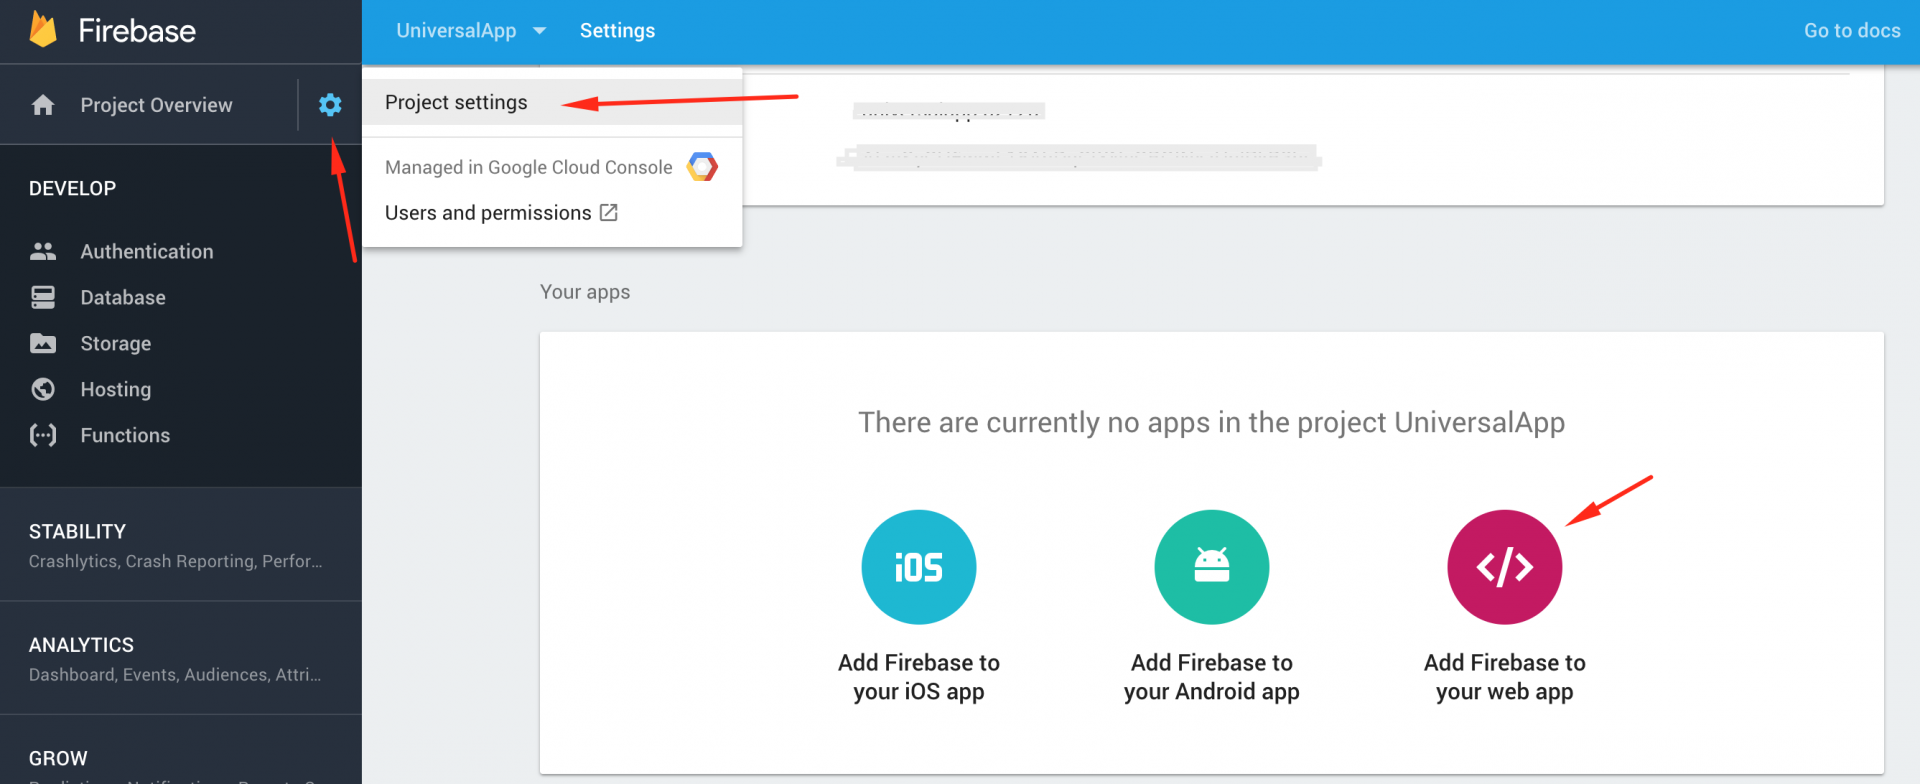
Your categories are will be saved in FireStore. FireStore is more advanced than Firebase Realtime Database. </p><p>
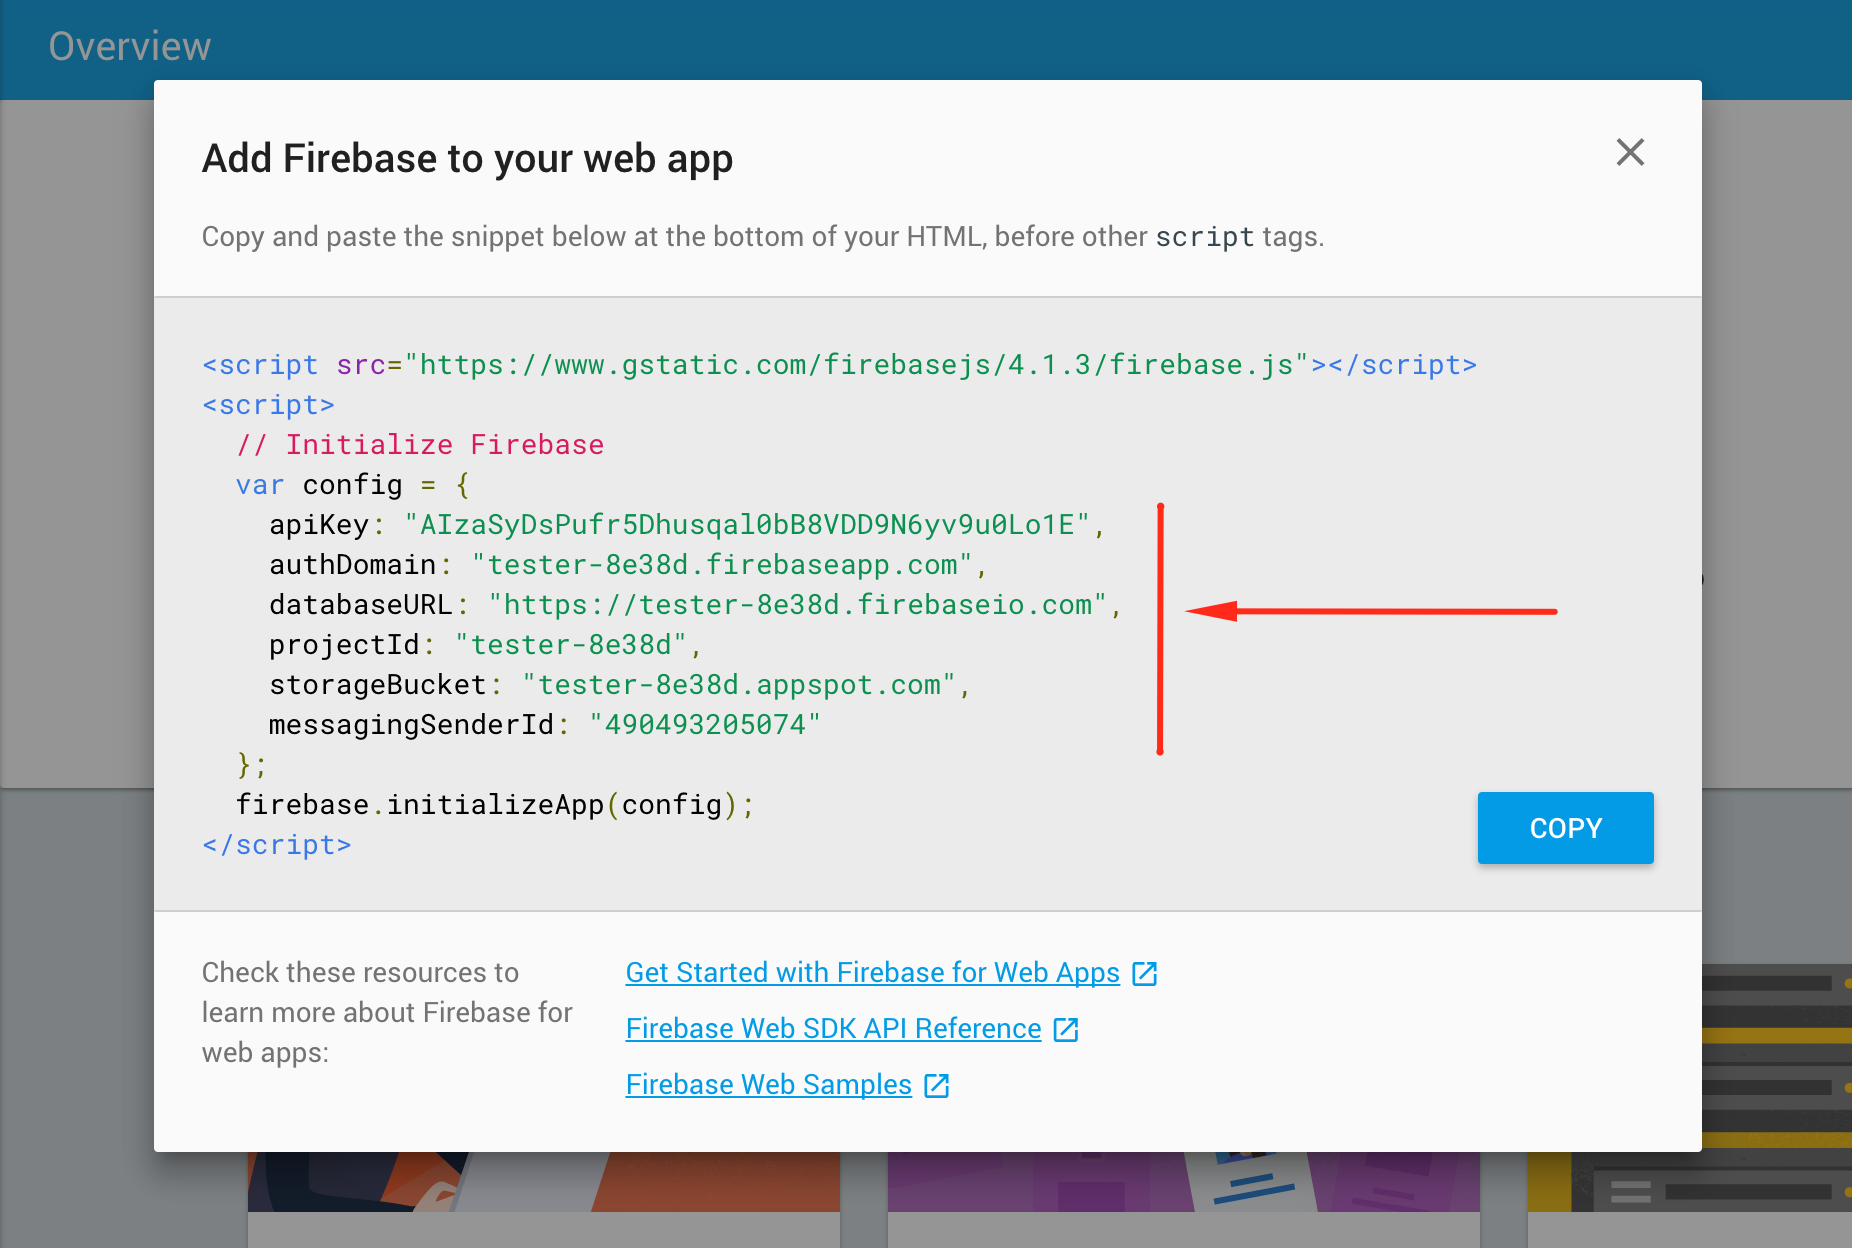
You should already have created a Firebase Project. Automatically you get a FireStore project also. <br /></p><h3><br /></h3><p>But thanks to the included FireBase admin panel, you will manage your data through it.</p><p>
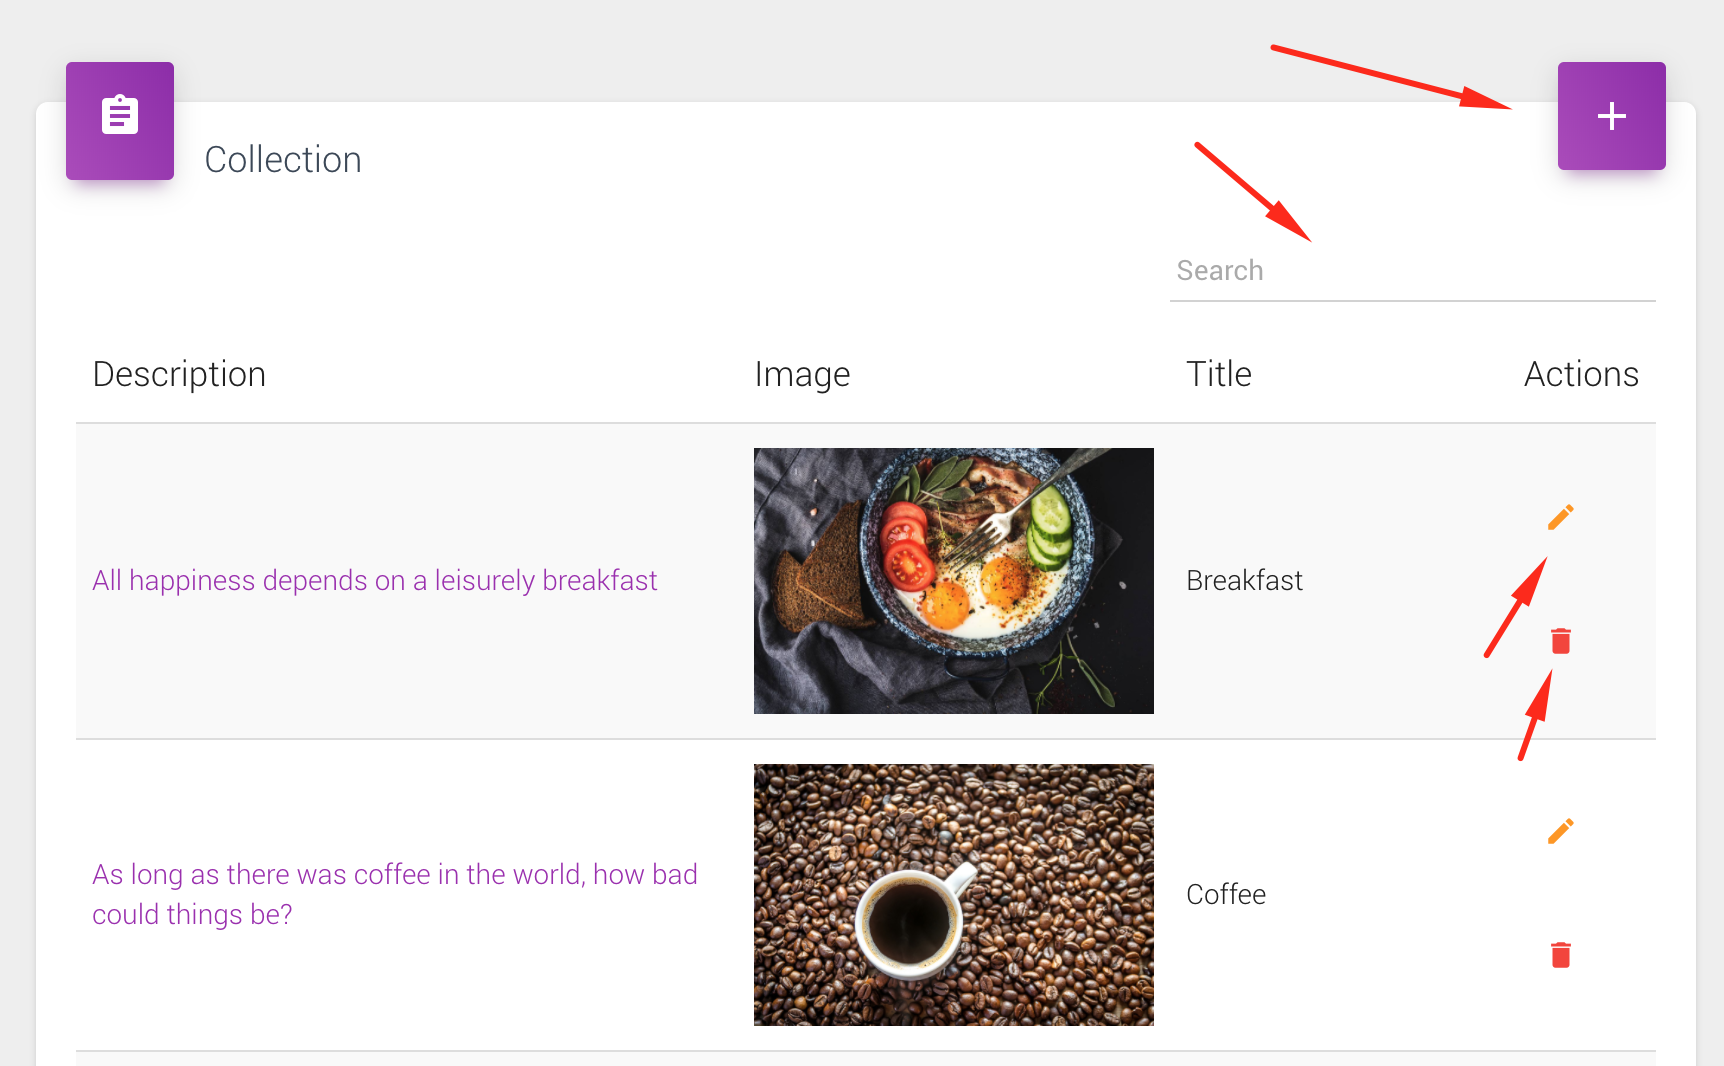
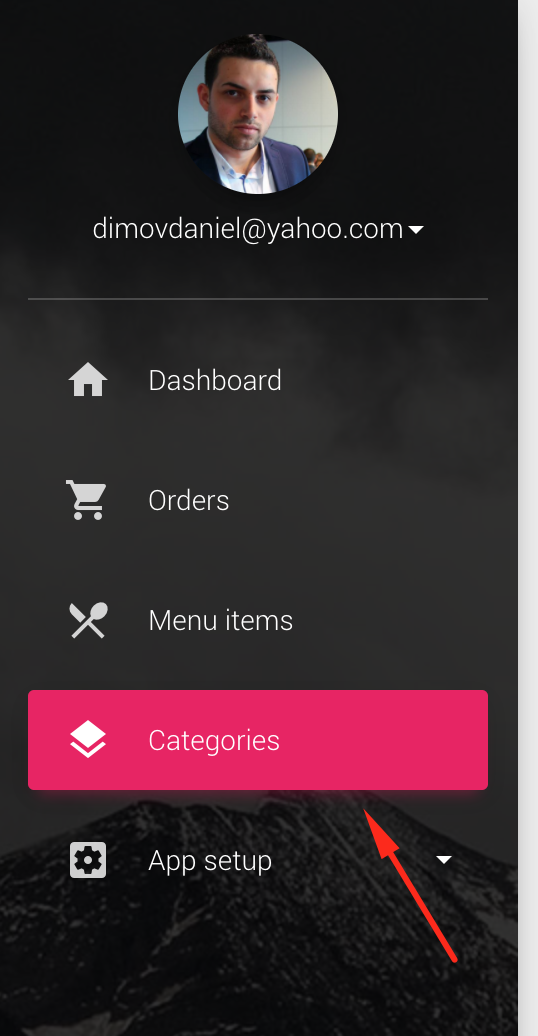
If you have successfully followed the install procedure from you should have a menu similar to this one.</p><p><br /></p><h3>Step 1. Go inside the categories</h3><p><img src="https://support-hub--assets.s3.eu-west-2.amazonaws.com/assets/74/images/ZOuoaOA9K2KKYiJ7TQo2UT2INi4QOygkA9ltCdT2.png" style="width:50%;" alt="ZOuoaOA9K2KKYiJ7TQo2UT2INi4QOygkA9ltCdT2.png" /></p><h3>Step 2. Adding your first category</h3><p>
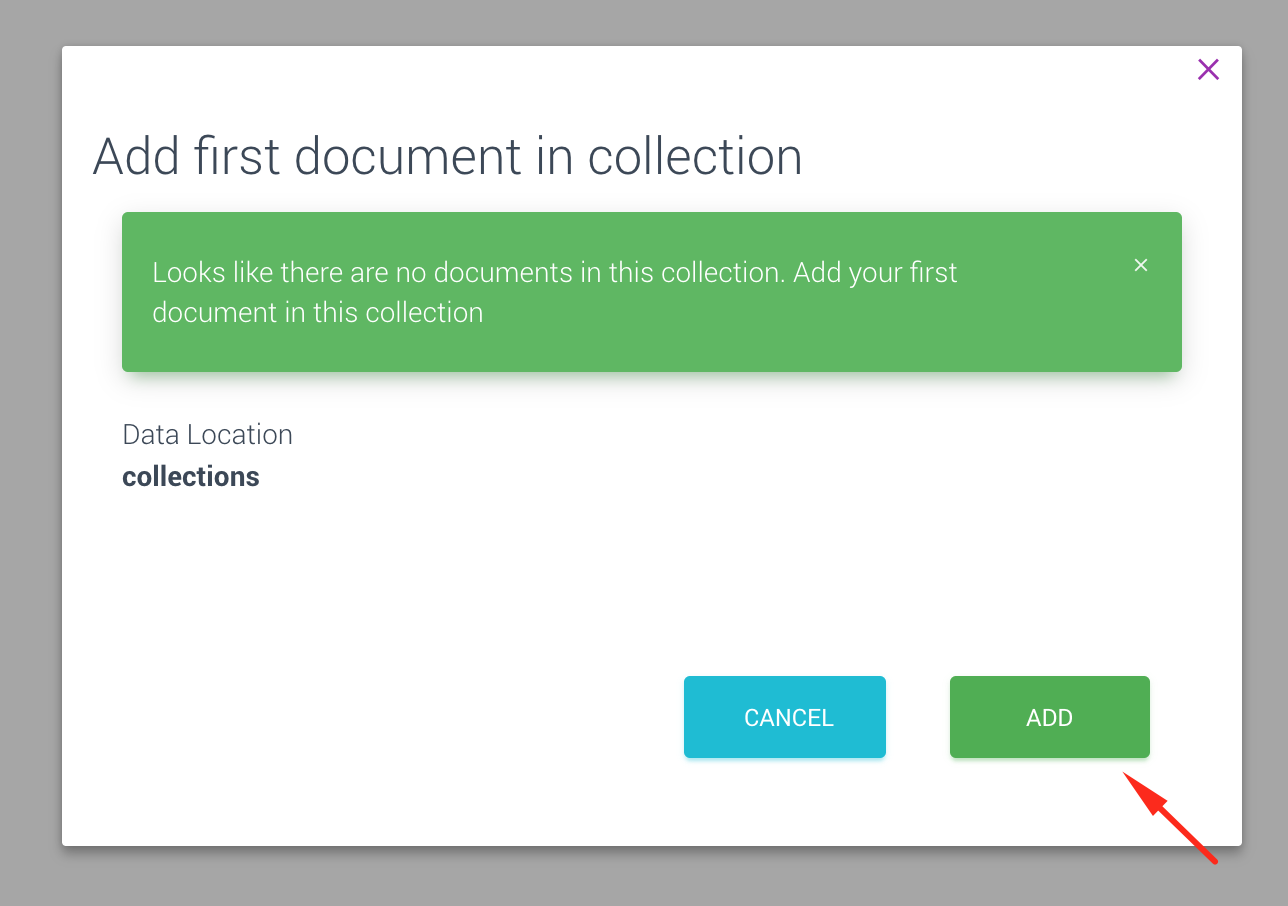
When you go for the first time in your collections, a pop-up will appear that allows you to add your first collection. </p><p>Pressing on the ADD button will add the first collection. </p><p><img src="https://support-hub--assets.s3.eu-west-2.amazonaws.com/assets/74/images/6n69KWbPSBTT6ufFeSdtUaWgrcf6Y2XhfnG4X82N.png" style="width:50%;" alt="6n69KWbPSBTT6ufFeSdtUaWgrcf6Y2XhfnG4X82N.png" /></p><h3>
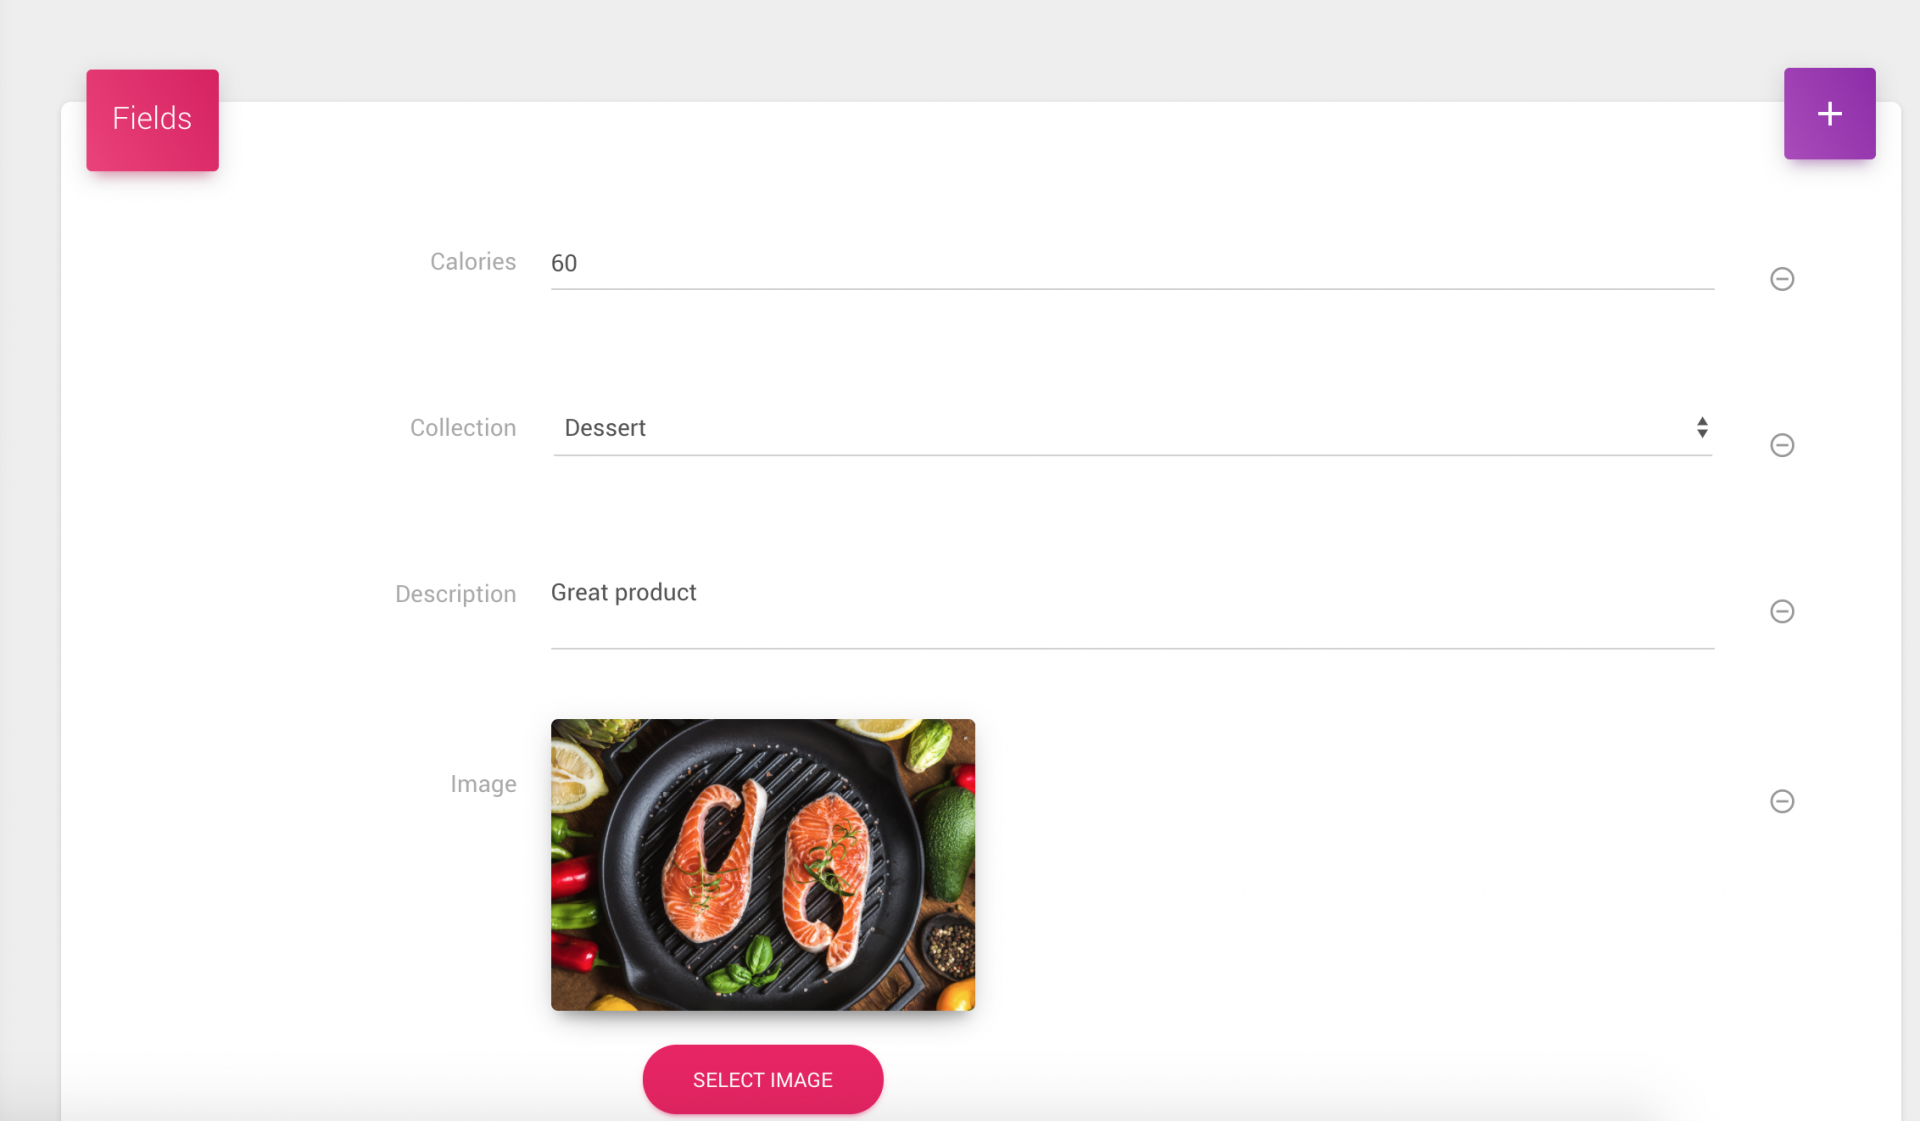
Step 3. Managing your collections</h3><p>You can add / delete / modify your collections. In the search bar, you can filter your collections. </p><p><img src="https://support-hub--assets.s3.eu-west-2.amazonaws.com/assets/74/images/hkBRoOOvpfGHQH5m6swP0189p6PAWMNrphmXj0i1.png" style="width:50%;" alt="hkBRoOOvpfGHQH5m6swP0189p6PAWMNrphmXj0i1.png" /></p><p><br /></p><p><br /></p><p><br /></p><p><br /></p><p><br /></p><p><br /></p><p><br /></p>]]>
            </summary>
                                    <updated>2018-11-20T13:49:37+00:00</updated>
        </entry>
            <entry>
            <title><![CDATA[Adding your products]]></title>
            <link rel="alternate" href="https://mobidonia.support-hub.io/articles/adding-your-products" />
            <id>https://mobidonia.support-hub.io/133</id>
            <author>
                <name><![CDATA[Daniel Dimov]]></name>
            </author>
            <summary type="html">
                <![CDATA[<p><br /></p><p>After you have added some of your collection, it is time to add your menu items.</p><p>Each of the menu items should be categorized. </p><p><br /></p><h3>Step 1. Go inside menu items </h3><p><img src="https://support-hub--assets.s3.eu-west-2.amazonaws.com/assets/74/images/76BT4OLCpN60HpvQl5SlxaKlbtGfaEzXqpxLadax.png" style="width:50%;" alt="76BT4OLCpN60HpvQl5SlxaKlbtGfaEzXqpxLadax.png" /></p><h3>Step 2. Add your first product </h3><p>As for the categories, you will be asked to add your first product. </p><p><img src="https://support-hub--assets.s3.eu-west-2.amazonaws.com/assets/74/images/q0UvY6BFxnDufaR4sQDEQlmwbhODgFAPVVAnuRMV.png" style="width:50%;" alt="q0UvY6BFxnDufaR4sQDEQlmwbhODgFAPVVAnuRMV.png" /></p><h3>Step 3. Manage your products</h3><p>You can preview / edit / delete / add products.</p><p>Each product has image, description etc.. all displayed in the details window on each product.</p><p><img src="https://support-hub--assets.s3.eu-west-2.amazonaws.com/assets/74/images/fPCInABxzevFjMKAFbhZvT8bxs6szOA7dSxmQtq8.png" style="width:50%;" alt="fPCInABxzevFjMKAFbhZvT8bxs6szOA7dSxmQtq8.png" /></p><h3>Step 3. Setting up prices</h3><p>To learn more about the pricing model for the product read the <a href="https://mobidonia.freshdesk.com/support/solutions/articles/35000047929-shopping-functionality" target="_blank" rel="noreferrer noopener">dedicated section on how to set up the prices.</a></p><p><br /></p><p><br /></p>]]>
            </summary>
                                    <updated>2018-11-20T13:56:58+00:00</updated>
        </entry>
            <entry>
            <title><![CDATA[Step 1. Install the script]]></title>
            <link rel="alternate" href="https://mobidonia.support-hub.io/articles/step-1-install-the-script" />
            <id>https://mobidonia.support-hub.io/294</id>
            <author>
                <name><![CDATA[Daniel Dimov]]></name>
            </author>
            <summary type="html">
                <![CDATA[<h6><br /></h6><p>The sync script is a node js project. It runs on any node enabled environment.</p><p>You can run it locally or on a server. ( Node Server / Hosting is preferred )</p><p><a href="https://www.netguru.co/blog/nodejs-hosting-services" target="_blank" rel="noreferrer noopener">https://www.netguru.co/blog/nodejs-hosting-services</a><br /></p><p><a href="https://hostadvice.com/hosting-companies/nodejs/">https://hostadvice.com/hosting-companies/nodejs/</a><a href="https://hostadvice.com/hosting-companies/nodejs/"></a></p><p><br /><span>Environment setup</span></p><p>First, you will need to set up your environment. Then will need Node + NPM installation. You will also need GIT on your system.</p><p>But first, upload the script you downloaded from codecanyon on any location you want to run it. <br /></p><p><br /></p><p><b>Install node and npm:</b> Download it from <a href="https://www.npmjs.com/get-npm" target="_blank" rel="noreferrer noopener">here</a>.</p><p><b>Install GIT</b>: Download it from <a href="https://git-scm.com/downloads" target="_blank" rel="noreferrer noopener">here</a>.<br /></p><p>To verify your installation run<br /></p><pre>node --version<br />npm --version<br />git --version</pre><p><b>Installing process manager</b></p><p>We suggest <a href="https://github.com/Unitech/pm2" target="_blank" rel="noreferrer noopener">pm2</a> for process management. Follow that guide and install the pm2 globally, we will need it later.</p><pre>npm install pm2 -g</pre><p><b>Installing the required node modules</b></p><p>To install the required node modules, go in your script folder ( where package.json is ) and run the following command.</p><pre>npm install</pre><p>The required node modules will be installed. </p>]]>
            </summary>
                                    <updated>2019-01-29T12:32:42+00:00</updated>
        </entry>
            <entry>
            <title><![CDATA[Step 2. Firebase setup]]></title>
            <link rel="alternate" href="https://mobidonia.support-hub.io/articles/step-2-firebase-setup" />
            <id>https://mobidonia.support-hub.io/295</id>
            <author>
                <name><![CDATA[Daniel Dimov]]></name>
            </author>
            <summary type="html">
                <![CDATA[<p>All the data is stored in Firestore database.</p><p>Let's get started. Create an account in Firebase with your google account. </p><p>( You may use existing firebase db )<br /></p><p>Create Firebase Project. </p><p>Then go in Project settings, and click on "Add Firebase to your web app"</p><p><img src="https://support-hub--assets.s3.eu-west-2.amazonaws.com/assets/74/images/kvUHIrBq6Miyok4W63Cl1khlFxui4FGbqLkgJq8F.png" style="width:50%;" alt="kvUHIrBq6Miyok4W63Cl1khlFxui4FGbqLkgJq8F.png" /></p><p>Then copy the config string. </p><p><img src="https://support-hub--assets.s3.eu-west-2.amazonaws.com/assets/74/images/ix2INWonx7jq89myrZAAvZTpqYliAmuqgwvpOoKd.png" style="width:50%;" alt="ix2INWonx7jq89myrZAAvZTpqYliAmuqgwvpOoKd.png" /><br /></p>]]>
            </summary>
                                    <updated>2019-01-29T12:33:06+00:00</updated>
        </entry>
            <entry>
            <title><![CDATA[Step 3. Set up the script]]></title>
            <link rel="alternate" href="https://mobidonia.support-hub.io/articles/step-3-set-up-the-script" />
            <id>https://mobidonia.support-hub.io/296</id>
            <author>
                <name><![CDATA[Daniel Dimov]]></name>
            </author>
            <summary type="html">
                <![CDATA[<p>in the start of the config.js you will find this code</p><pre>var settings={<br />  serverPort:8000,<br />  appName:"Shopify Sync",<br />  shopifySite:"https://mobidonia.myshopify.com",  //Link to your shopify store<br />  firestoreCollectionForCategories:"product_collection_shopify", //Where to save the collections<br />  firestoreCollectionForProduct:"products_shopify", //Where to save the products<br />  cronInterval:"00 59 20 * * 1-5", //How ofter should the cron job run https://github.com/kelektiv/node-cron<br />}</pre><p>The above code sets up the script. What you have to do is just replace <b>shopifySite</b> with the link to your Shopify site.</p><p>The <b>cronInterval</b> set how often the script should be called.</p><p>In the example above is Monday - Saturday at 20:59</p><p>Read more here <a href="https://github.com/kelektiv/node-cron" target="_blank" rel="noreferrer noopener">https://github.com/kelektiv/node-cron</a></p><p><br /></p><p><br /></p>]]>
            </summary>
                                    <updated>2019-01-29T12:33:20+00:00</updated>
        </entry>
            <entry>
            <title><![CDATA[Step 4. Running the script]]></title>
            <link rel="alternate" href="https://mobidonia.support-hub.io/articles/step-4-running-the-script" />
            <id>https://mobidonia.support-hub.io/297</id>
            <author>
                <name><![CDATA[Daniel Dimov]]></name>
            </author>
            <summary type="html">
                <![CDATA[<p><br /></p><p>Before you have installed pm2. With this program, the node js program will run when you close your terminal.</p><p>To see what process is running enter</p><pre>pm2 list</pre><p>To start the process enter</p><pre>pm2 start index.js --name shopify</pre><p>This will start the process</p><p>To stop the process enter</p><pre>pm2 stop shopify</pre><p><br /></p>]]>
            </summary>
                                    <updated>2019-01-29T12:33:35+00:00</updated>
        </entry>
    </feed>
