<?xml version="1.0" encoding="UTF-8"?>
<feed xmlns="http://www.w3.org/2005/Atom" xml:lang="">
                        <id>https://mobidonia.support-hub.io/feed/124</id>
                                <link href="https://mobidonia.support-hub.io/feed/124" rel="self"></link>
                                <title><![CDATA[Firebase And Firestore FireAdmin - admin panel console Article Feed]]></title>
                    
                                <subtitle></subtitle>
                                                    <updated>2019-09-03T12:41:40+00:00</updated>
                        <entry>
            <title><![CDATA[Installation]]></title>
            <link rel="alternate" href="https://mobidonia.support-hub.io/articles/instalation" />
            <id>https://mobidonia.support-hub.io/232</id>
            <author>
                <name><![CDATA[Daniel Dimov]]></name>
            </author>
            <summary type="html">
                <![CDATA[<h2>Environment setup<br /></h2>
<p>First you will need to setup your environment. This is ReactJS project, and for it, we will need Node + NPM installation. You will also need GIT on your system.</p>
<p><strong>Install node and npm</strong>: Download it from here.</p>
<p><strong>Install GIT</strong>: Download it from <a href="https://www.npmjs.com/get-npm">here</a>.</p>
<p>To verify your installation run</p>
<pre><code>node --version
npm --version
git --version</code></pre>
<h2>Start the local server</h2>
<p>Extract the downloaded zip file. Using your terminal / command prompt go in that folder and run the follwing command</p>
<pre><code>npm install
npm start</code></pre>
<p>This will start your local node server, and automatically should open your localhost:3000</p>]]>
            </summary>
                                    <updated>2019-01-29T10:25:24+00:00</updated>
        </entry>
            <entry>
            <title><![CDATA[Allow us to configure Firebase Admin Panel for you]]></title>
            <link rel="alternate" href="https://mobidonia.support-hub.io/articles/allow-us-to-configure-firebase-admin-panel-for-you" />
            <id>https://mobidonia.support-hub.io/85</id>
            <author>
                <name><![CDATA[Daniel Dimov]]></name>
            </author>
            <summary type="html">
                <![CDATA[<h5>Step 1.</h5><p>In your Project, click on the cog icon. </p><p>Then click on<b> Users and permissions</b></p><p><img src="https://support-hub--assets.s3.eu-west-2.amazonaws.com/assets/74/images/mjjc4BFk0qsXjuUxi2AYaCDCscF7JbNj5r4Obdml.png" alt="mjjc4BFk0qsXjuUxi2AYaCDCscF7JbNj5r4Obdml.png" /><br /></p>

<h5>Step 2. </h5><p>Now click on Add Member button and enter</p><p><b>mobidonia@gmail.com</b> as editor</p><p>Then click on Add Member</p>

<p></p>

<p>	<img src="https://support-hub--assets.s3.eu-west-2.amazonaws.com/assets/74/images/dBNUMUGQIUpgrEJR0T4yDm5Q2Wgp2XP80LG6uoAW.png" alt="dBNUMUGQIUpgrEJR0T4yDm5Q2Wgp2XP80LG6uoAW.png" /><br /></p>

<p>Now we can see your database. </p><p>After the problem is resolved, you can revoke the access by deleting our user from there. </p>

<p>	<br /></p>

<p>	<br /></p>

<p>    </p>]]>
            </summary>
                                    <updated>2018-10-17T20:39:55+00:00</updated>
        </entry>
            <entry>
            <title><![CDATA[Connect To Firebase]]></title>
            <link rel="alternate" href="https://mobidonia.support-hub.io/articles/connect-to-firebase" />
            <id>https://mobidonia.support-hub.io/231</id>
            <author>
                <name><![CDATA[Daniel Dimov]]></name>
            </author>
            <summary type="html">
                <![CDATA[<h2>Create Firebase account<br /></h2>
<p>In this step you will connect your Firebase instance with the FireAdmin Panel.</p>
<p>To get your connection detail go in <a href="https://console.firebase.google.com/">Firebase Console</a>. If you don't have account, register new one and create new app. Go inside your app and from the <strong>Overview-&gt;Project Settings</strong> click on <strong>Add Firebase to your web app</strong></p>
<p></p>
<p><img src="https://support-hub--assets.s3.eu-west-2.amazonaws.com/assets/74/images/Kr1LPvdyGj3HmcXMFdniU47W5Lpl3ZH123TkqLxh.png" alt="Kr1LPvdyGj3HmcXMFdniU47W5Lpl3ZH123TkqLxh.png" /><br /></p><p>Copy the <strong>config</strong> element content and paste in <strong>"src/config/app.js"</strong> in the <strong>firebaseConfig</strong> variable, in the source code you got from CodeCanyon</p>
<p>Now in order to be able to login, add user with email in <strong>"Authentication"</strong></p>
<h2>Create the real time database</h2>
<p>Go to Database and then click on the button called  "Create database"</p><p><img src="https://support-hub--assets.s3.eu-west-2.amazonaws.com/assets/74/images/rq2P2DhRpvOuL8BSH3djxgzXncdr4wRiSt8kflYC.png" alt="rq2P2DhRpvOuL8BSH3djxgzXncdr4wRiSt8kflYC.png" /><br /></p>
<p></p>
<p>After clicking on the button it should appear a window that will ask you about security rules. Click on the Start in <strong>test mode</strong> and after that click <strong>Enable</strong>.</p><p><img src="https://support-hub--assets.s3.eu-west-2.amazonaws.com/assets/74/images/c40lOYko0w0IHRBlKem7L42jBlrV1dcEubpVReUU.png" alt="c40lOYko0w0IHRBlKem7L42jBlrV1dcEubpVReUU.png" /><br /></p>
<p>With rules configured like this everyone can read and write in your database. This is ok for test and development purposes.</p>
<p>But for production, this is a good starting point. This will allow edit and write to all registered users.</p>
<pre><code>{
  "rules": {
    ".read": "auth !== null",
     ".write": "auth !== null"
  }
}</code></pre>
<h2>Create Firestore Database</h2>
<p><strong>Go in Databases -&gt;Cloud Firestore</strong></p><p><img src="https://support-hub--assets.s3.eu-west-2.amazonaws.com/assets/74/images/6vpyHzLlRRrzZvtKKqLAvTq8OK7VGNTlzDe8psmj.png" alt="6vpyHzLlRRrzZvtKKqLAvTq8OK7VGNTlzDe8psmj.png" /><br /></p>
<p>Then, a pop up will appear.</p><p><img src="https://support-hub--assets.s3.eu-west-2.amazonaws.com/assets/74/images/Zovq91dO4lFEzeAT2HxKvRcGkrIBL2QdIRduzY4f.png" alt="Zovq91dO4lFEzeAT2HxKvRcGkrIBL2QdIRduzY4f.png" /><br /></p>
<p>For now, use Start in test mode.</p>
<h2>Start your app builder locally</h2>
<p>In your project opened in the terminal or command line run the command <strong>npm start</strong>. After running this command in your browser you should see a newly opened window looking like this one like in the picture below.</p><p><img src="https://support-hub--assets.s3.eu-west-2.amazonaws.com/assets/74/images/dfblbGvaPtHQRjJnaG2aLQUaTwxpWagmjp5zl2Uv.png" alt="dfblbGvaPtHQRjJnaG2aLQUaTwxpWagmjp5zl2Uv.png" /><br /></p>
<h2>Create a user in Firebase</h2>
<p>After this you should create a user in firebase for been able to login to your the app builder.</p>
<p>Go into firebase console and click on Authentication and after that click on <strong>Set up sign-in method</strong></p><p><img src="https://support-hub--assets.s3.eu-west-2.amazonaws.com/assets/74/images/04XUpKM1Deg9QNgrJ0Fc3XNP1SJrKT4RNKJqmZRA.png" alt="04XUpKM1Deg9QNgrJ0Fc3XNP1SJrKT4RNKJqmZRA.png" /><br /></p>
<p>Click on <strong>Email/Password</strong> and enable them and click Save.</p><p><img src="https://support-hub--assets.s3.eu-west-2.amazonaws.com/assets/74/images/Mm2wMBt01LV5To1cFQe7qIWKk4FwkDyWdv3pttsB.png" alt="Mm2wMBt01LV5To1cFQe7qIWKk4FwkDyWdv3pttsB.png" /><br /></p>
<p>Now click on <strong>Users</strong> and now you should be able to click on <strong>Add user</strong>.</p><p><img src="https://support-hub--assets.s3.eu-west-2.amazonaws.com/assets/74/images/YLO471xK5om30NafgeppajWOQfm9nFRp1lM1Ti35.png" alt="YLO471xK5om30NafgeppajWOQfm9nFRp1lM1Ti35.png" /><br /></p>
<p>Enter your email and  password click Add user.</p>
<p>Login to your builder whit the email and password that you added.</p><p><img src="https://support-hub--assets.s3.eu-west-2.amazonaws.com/assets/74/images/8ntxgDaEcJq7BHzyQOHZ9OVizVmErlU4fQUir8WF.png" alt="8ntxgDaEcJq7BHzyQOHZ9OVizVmErlU4fQUir8WF.png" /><br /></p>]]>
            </summary>
                                    <updated>2019-01-29T10:25:24+00:00</updated>
        </entry>
            <entry>
            <title><![CDATA[Navigation]]></title>
            <link rel="alternate" href="https://mobidonia.support-hub.io/articles/navigation" />
            <id>https://mobidonia.support-hub.io/233</id>
            <author>
                <name><![CDATA[Daniel Dimov]]></name>
            </author>
            <summary type="html">
                <![CDATA[<h2>Setup navigation</h2>
<p>Ok, now the most important step. To setup your navigation.</p>
<p>The navigation system is the core of this project. It can point to different data paths in your Firebase. You also have to option to build multilevel menus.</p>
<p>To get started, go in the config file <strong>"src/config/app.js"</strong>. There at the end you will find <strong>"exports.navigation"</strong></p>
<p>We have the folowing pages,</p>
<ul><li><strong>"/"</strong> - the dashboard page ("containers/App.js")</li>
<li><strong>"push"</strong> - The push notification page ("containers/Push.js")</li>
<li><strong>"fireadmin"</strong> - the Firebase manager ("containers/Fireadmin.js")</li>
<li><strong>"firestore"</strong> - the Firestore manager ("containers/Firestore.js") - since version 3.0.0</li>
</ul><p>And you can re-use "fireadmin" and "firestore" pages multiple times to build your menu. As for example, we will be building admin panel for a app, that list events per night club in different cities. You can get the <a href="https://gist.github.com/dimovdaniel/1c30b1bbf877b04e6fa0fed875b9bdea">demo schema here</a> so you can practice on your own if you want. So lets get started, and explain what each item does.</p>
<pre><code>{
      "link": "fireadmin",
      "path": "clubs",
      "name": "Clubs",
      "icon":"room",
      "tableFields":["name","description"],
      "subMenus":[
        {
          "link": "fireadmin",
          "path": "clubs/skopje/items",
          "name": "Skopje",
          "icon":"event",
          "tableFields":["name","description"]
        },{
          "link": "fireadmin",
          "path": "clubs/sofia/items",
          "name": "Sofia",
          "icon":"event",
          "tableFields":["name","description"],
        }
      ]
},
{
      "link": "fireadmin",
      "path": "static",
      "name": "Cities &amp; Genres",
      "icon":"location_city",
      "tableFields":["name","description"],
},
{
      "link": "firestoreadmin",
      "path": "events",
      "name": "FireStore Events",
      "icon":"event",
      "tableFields":["name"],
},
{
      "link": "firestoreadmin",
      "path": "clubs",
      "name": "FireStore Clubs",
      "icon":"disco",
      "tableFields":["name","description"],
},</code></pre>
<p>On the code above, we are displaying 4 menus ( 2 Firebase, 2 Firestore). One with submenus, and 3 normal menu. Each of them, includng the sub menus, have: link,path,name,icon,tableFields.</p>
<p><strong>link</strong> - components used, in all cases "firebase"
<strong>path</strong> - Firebase path, ex "clubs/skopje/items"
<strong>name</strong> - Name of the menu, you can name it as you wish
<strong>icon</strong> - <a href="https://material.io/icons/">Material design icons</a></p>
<p><strong>tableFields</strong> - Array of fields, that should be displayed in the table when viewing the data
<strong>subMenus</strong> - List of sub menus, they have the same elements.</p>
<p><a href="videos.php#installation">View video of setting up navigation</a></p>]]>
            </summary>
                                    <updated>2019-01-29T10:25:24+00:00</updated>
        </entry>
            <entry>
            <title><![CDATA[Schema setup Firebase]]></title>
            <link rel="alternate" href="https://mobidonia.support-hub.io/articles/firebase" />
            <id>https://mobidonia.support-hub.io/234</id>
            <author>
                <name><![CDATA[Daniel Dimov]]></name>
            </author>
            <summary type="html">
                <![CDATA[<h2>Set up Firebase</h2>
<p>In order to have the posibilities of adding complete elements, let's say add new events, with all fields inside, we will need to have the "Schema" definied so the admin panel to understand to how the new elements should look. When you define your schema, your will see a "+" button on top of each table, allowing you to insert new items.</p>
<p>The schema should be defined in <strong>"src/config/schema.json"</strong>.</p>
<p>If you are just starting with your Firebase, on a fresh new project, and you have some small number of dataitems there, you can export your current data as json, and use it as your schema. You can modify the first element of each section with some general data.</p>
<p>If you are already running a firebase instance, and have big amount of data, best will be to define the schema on your own, folowing the patern from your database structure. . Or you can export your data, and remove element from your data, leaving only one per each point in your data structure.</p>
<p>Since v2.0.0 the ordering of the schema fields control the ordering of the data inside the admin panel.</p>]]>
            </summary>
                                    <updated>2019-01-29T10:25:24+00:00</updated>
        </entry>
            <entry>
            <title><![CDATA[Schema setup Firestore]]></title>
            <link rel="alternate" href="https://mobidonia.support-hub.io/articles/firestore" />
            <id>https://mobidonia.support-hub.io/235</id>
            <author>
                <name><![CDATA[Daniel Dimov]]></name>
            </author>
            <summary type="html">
                <![CDATA[<h2>Set up Firestore </h2>
<p>In order to have the posibilities of adding complete elements, let's say add new events, with all fields and collections inside, we will need to have the "Schema" definied so the admin panel to understand to how the new elements and collections should look. When you define your schema, your will see a "+" button on top of each table, allowing you to insert new collections and documents.</p>
<p>The schema for Firestore should be defined in <strong><em>"src/config/firestoreschema.json"</em></strong>.</p>
<p>Let'm make Firestore simple. Firstore consists of Collection and documents.</p>
<p><strong>STEP 1</strong>. write all your collections ex, no need to nest them</p>
<pre><code>var collectionMeta={
    "events":{},
    "tickets":{}
}</code></pre>
<p><strong>STEP 2</strong>. add the "collections" element in each of them. Example each event's document has collection of ticketes. And tickets doesn't have any collection so just use empty array</p>
<pre><code>var collectionMeta={
    "events":{
        "collections":["tickets"],
    },
    "tickets":{
        "collections":[],
    }
}</code></pre>
<p><strong>STEP 3</strong>. describe each collection documents by adding the "fields" element ex.</p>
<pre><code>var collectionMeta={
    "events":{
        "fields":{
            "name":"My Event name"
        },
        "collections":["tickets"],
    },
    "tickets":{
        "fields":{
            "price":"300",
            "name":"My ticket name"
        },
        "collections":[],
    }
}</code></pre>]]>
            </summary>
                                    <updated>2019-01-29T10:25:24+00:00</updated>
        </entry>
            <entry>
            <title><![CDATA[Fields setup]]></title>
            <link rel="alternate" href="https://mobidonia.support-hub.io/articles/fields" />
            <id>https://mobidonia.support-hub.io/250</id>
            <author>
                <name><![CDATA[Dimitar Mojsoski]]></name>
            </author>
            <summary type="html">
                <![CDATA[<h2>Fields setup </h2>
<p>Most usefull feature of the admin panel is that is can display your data in different contianes, and not just a text fild. You can defined, dates, dropdowns, image pickers, html editor etc.
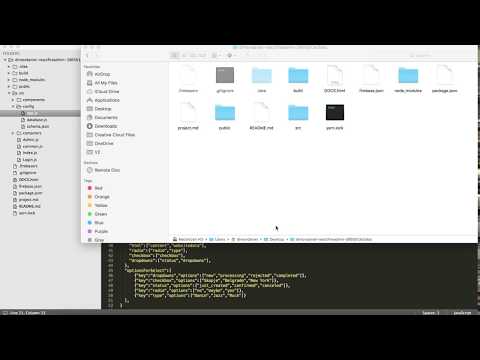
</p>
<p>To setup the filds go in <strong>"src/config/app.js"</strong> and there you will find the <strong>adminConfig-&gt;fieldsTypes</strong> element. Each field inside list typeOfField:[list of names of firebase fields that should be converted to given type].</p>
<pre><code>"fieldsTypes":{
    "photo":["photo","image"],
    "dateTime":["datetime","start"],
    "date":["date","created"], //removed in v4.0.0
    "time":["time"], //removed in v4.0.0
    "textarea":["description"],
    "html":["content"],
    "radio":["radio"],
    "checkbox":["checkbox"],
    "map":["map","latlng","location"], //since v3.0.0
    "dropdowns":["status","dropdowns"],
        "file":["video"],       //since v2.0.0
        "rgbaColor":['rgba',"*Color"],  //since v2.0.0  //Since 3.2.0 you can use * to math all fields ending on some key ex. textColor, rowColor etc..
        "hexColor":['color'],   //since v2.0.0
        "relation":['type'],    //since v2.0.0
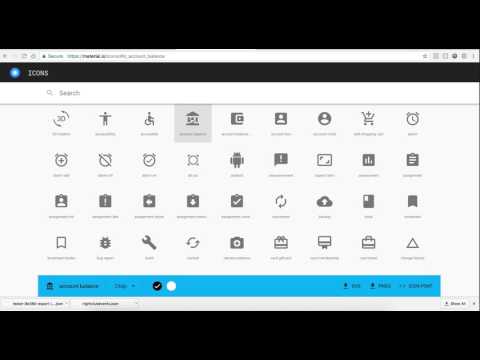
        "iconmd":['icon'],      //Material Icon since v2.1.0
        "iconfa":['iconfa'],    //FontAwesome since v2.1.0
        "iconti":['iconti'],    //Typicons since v2.1.0

  },</code></pre>
<p>
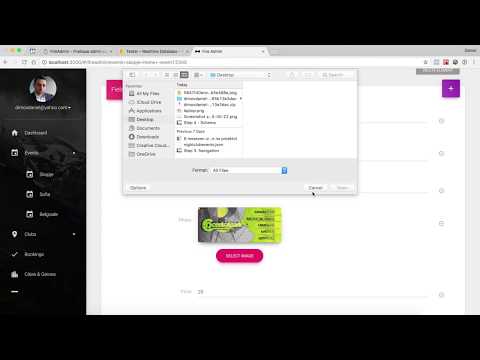
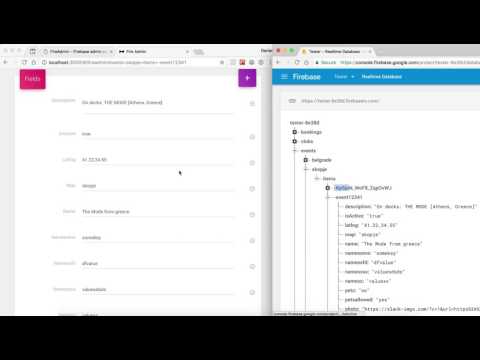
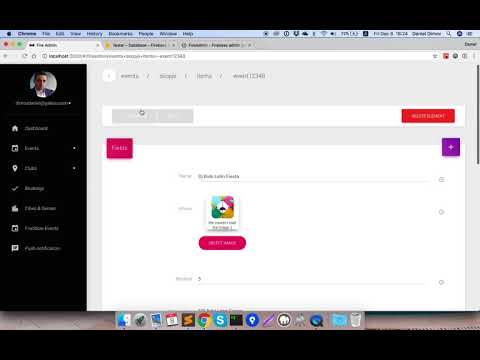
So for an example. If you have a fields "photo" in your data, the firebase admin, with get the URL of the photo and convert it to image view with upload button. You can extend the list of fields here and add your own field types. The code for doing that is located in <strong>"src/components/fields/Fields.js"</strong>.</p>
<p>Our most advance component is the HTML WYSWYG editor. It is based on <a href="https://github.com/jpuri/react-draft-wysiwyg">this</a> module. You can write your HTML there, put remote images etc..</p>
<p>radio,checkbox and dropdowns are special type of filds that can have predefined values for their selection. To manage it, you will see the element "optionsForSelect" in the same "adminConfig" element in "src/config/app.js". Here is how it looks. You can list your field, and add the options that should be there for that field.</p>
<pre><code>"optionsForSelect":[
      {"key":"dropdowns","options":["new","processing","rejected","completed"]},
      {"key":"checkbox","options":["Skopje","Belgrade","New York"]},
      {"key":"status","options":["just_created","confirmed","canceled"]},
      {"key":"radio","options":["no","maybe","yes"]}
  ],</code></pre>
<p><a href="http://fireadmin.mobidonia.com/videos.php#installation">
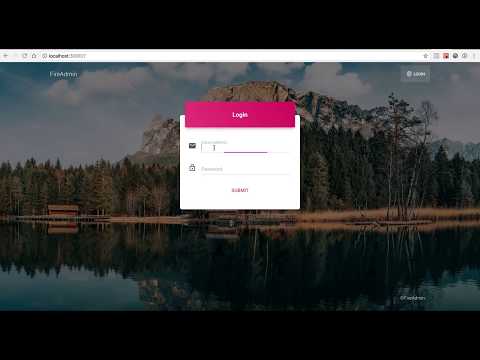
View video of setting up fields</a></p>
<h3>Relations</h3><p>
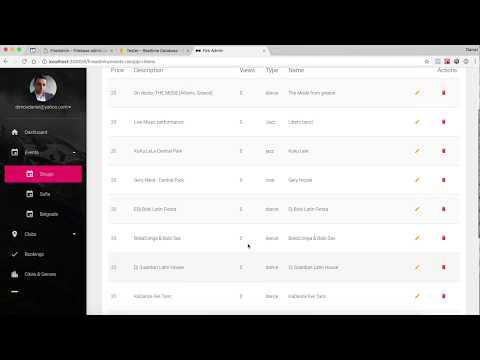
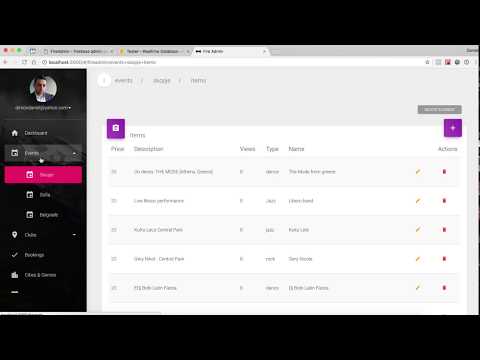
Sine v2.0.0 there is new "Relation" field. This field is really powerfull because gives relations capabilities to Firebase. It can display list of data (ex.Categories) in givven field list (ex.Article details). This action can also create additional fields in firebase so later can be used in your search query in Firebase. To manage it, you will see the element "optionsForRelation" in the same "adminConfig" element in "src/config/app.js". Here is how it looks. You can list your field, and add the options that should be there for that field.</p>
<pre><code>"optionsForRelation":[
        {
            "key":"type", //Type of fields, always remains same
            "path":"/static/genres/items", //Path to the referenced data, ex Categories in article
            "value":"name", //What key to put in the "value" of the select
            "display":"name", //What key to put in the "name" of the select element
            "isValuePath":false, //If true, for the value we will put the value key, if false, we will use the path to the referenced object
            "produceRelationKey":true, //You will need new field automaticaly produced if you want to query the reference ex. Category -&gt; Action
            "relationKey":"type_eventid", //Name of the newly produced field
            "relationJoiner":"-" //How the values of the both object are joined ex. category_id-article_id
        },
],</code></pre>
<p><a href="http://fireadmin.mobidonia.com/videos.php#installation">View video of setting up relation fields</a></p>
<p>Sine v4.0.0 there is new and improuved "DateTime" field based on this module. The React-DateTime module is based on moment.js. So follow the date/time formating of moment.js as explained here. To manage it, you will see the element "optionsForDateTime" in the same "adminConfig" element in "src/config/app.js". Here is how it looks.</p>
<pre><code>"optionsForDateTime":[
    {"key":"end", "dateFormat":"YYYY-MM-DD" ,"timeFormat":true, "saveAs":"x","locale":"es"},
    {"key":"start", "dateFormat":"YYYY-MM-DD" ,"timeFormat":"HH:mm", "saveAs":"YYYY-MM-DD HH:mm"},
  ],
</code></pre>
<p>Each element has:</p>
<ul><li><strong>key</strong>: The key that affects this setup - firebase or firestore</li>
<li><strong>dateFormat</strong>: Date Format to display in the fields and on the component. This can be string or boolean. Follow the date/time formating of moment.js as explained <a href="http://momentjs.com/docs/#/parsing/string-format/">here</a></li>
<li><strong>timeFormat</strong>: Time Format to display in the fields and on the component. This can be string or boolean. Follow the date/time formating of moment.js as explained <a href="http://momentjs.com/docs/#/parsing/string-format/">here</a></li>
<li><strong>saveAs</strong>: In what format to save in the database. This is also used for reading and convertign. Ex "x" will save it as timestamp. Follow the date/time formating of moment.js as explained <a href="http://momentjs.com/docs/#/parsing/string-format/">here</a></li>
<li><strong>locale</strong>: Components locale, optional. Default is en</li>
</ul>]]>
            </summary>
                                    <updated>2019-06-13T08:54:26+00:00</updated>
        </entry>
            <entry>
            <title><![CDATA[CRUD]]></title>
            <link rel="alternate" href="https://mobidonia.support-hub.io/articles/crud" />
            <id>https://mobidonia.support-hub.io/272</id>
            <author>
                <name><![CDATA[Dimitar Mojsoski]]></name>
            </author>
            <summary type="html">
                <![CDATA[<h2>Create</h2>
<p>There are two types of creating data. Creating a fields, is creatign new fields inside existing element. You enter the name and the value. It doesn't require the schema to be set. You can also add complete elment with all his predefined data. In our example, we can add new events ( with all fields ), clubs etc. This way of inserting reguires your schema to be set.</p>
<p>In the second method, when you create complete object (ex. events ) you have two ways of inserting your data.
As a <strong>timestamp</strong> where we use the key + timestam. and
As a <strong>push</strong> where we use the firebase keys to insert your new data.
This is per all data and can be set up in <strong>"scr/config/app.js"</strong> in the <strong>adminConig</strong> element you will find field <strong>methodOfInsertingNewObjects</strong></p><p><strong><br /></strong></p>
<h2>Read</h2>
<p>Depending on the type of data to be presented, we are automatically displaying your fields in a "fields" group. If we see an array, we display it as a table. If we see regular elements we display them ad buttons in the "elements" group.</p>
<p>If you want your elements to be grouped in a table, in <strong>"scr/config/app.js"</strong> in the <strong>adminConig</strong> element you will find field <strong>prefixForJoin</strong>. Here you can define what kind of elements you want to be grouped into a table. In our case, all our event start with the prefix <strong>"-event"</strong>. This is common practice in Firebase. Even the elements pushed in Firebase have prefix, that is different per each instance. You can use it to group you element.</p>
<p>Central part of our project is the "TableView" where we display your data. You can define what fields should be displayed ( in table, and in table header). In <strong>"scr/config/app.js"</strong> in the <strong>navigation</strong> on each "firebase" item you can have <strong>tableFields</strong>. This is list of fields to be displayed.</p><p><br /></p>
<h2>Update</h2>
<p>Using ReactJS state change we are updating your data on fly. So there is no save button in order to update your data. Just modify your content and it is updated directly in firebase. This also applies to the HTML WYSWYG editor.</p><p><br /></p>
<h2>Delete</h2>
<p>As for create, for delete you have two options. Delete single fields, that you will see at right of each field, and delete everithing in current path ( a delete button on top ). Both of them triger same fuction for deleting notifaing you that everithing under this path will be completly removed (Firebase) and that SubCollection will not be deleted for (Firestore).</p>
<p><a href="http://fireadmin.mobidonia.com/videos.php#crud">View video of CRUD</a></p>]]>
            </summary>
                                    <updated>2019-01-29T10:25:53+00:00</updated>
        </entry>
            <entry>
            <title><![CDATA[Authorization]]></title>
            <link rel="alternate" href="https://mobidonia.support-hub.io/articles/authorization" />
            <id>https://mobidonia.support-hub.io/261</id>
            <author>
                <name><![CDATA[Dimitar Mojsoski]]></name>
            </author>
            <summary type="html">
                <![CDATA[<h2>Manage who and how can access this admin panel.<br /></h2>
<p>The users inside your "Authentication" in Firebase, are the user that can asses this domain. This in most of the cases can be your app user. And you don't want any of your user to be able to login inside the admin panel, right. So if you go in <strong>"scr/config/app.js"</strong> in the <strong>adminConig</strong> element you will find field <strong>allowedUsers</strong>. If it is null, every user is able to login. Make an array of emails to list who can access the data ex. ["admin@myemail.com","anotheradmin@myemail.com"]</p>
<p>Also there is available option for user registration. If you go in <strong>"scr/config/app.js"</strong> in the <strong>adminConig</strong> element you will find field <strong>allowRegistration</strong> and by default this option is false. By changing this option to true register option should be shown together with login option.</p>
<p>You can also manage who and how can manage the data using the Firebase Database Rules system.</p>
<p><a href="http://fireadmin.mobidonia.com/videos.php#crud">View video of Authorization</a></p>]]>
            </summary>
                                    <updated>2019-01-29T10:25:24+00:00</updated>
        </entry>
            <entry>
            <title><![CDATA[Setup Push Notifications]]></title>
            <link rel="alternate" href="https://mobidonia.support-hub.io/articles/notifications" />
            <id>https://mobidonia.support-hub.io/263</id>
            <author>
                <name><![CDATA[Dimitar Mojsoski]]></name>
            </author>
            <summary type="html">
                <![CDATA[<h2>Send push notification from your admin panel<br /></h2>
<p>The admin panel can sen push notification to Firebase or <a href="http://onesignal.com/">OneSignal</a></p>
<h2>OneSignal</h2>
<p>To configure OneSignal push notification, first regiser account and app in <a href="http://onesignal.com/">OneSignal</a>. Then in <strong>"src/config/app.js"</strong> on the bottom you will find <strong>exports.pushSettings</strong>. There enter the <code>oneSignal_REST_API_KEY</code> and <code>oneSignal_APP_KEY</code> that you have form OneSignal. Done</p>
<h2>Firebase Push</h2>
<p>In <strong>"src/config/app.js"</strong> on the bottom you will find <strong>exports.pushSettings</strong>. There enter the <a href="https://stackoverflow.com/questions/37427709/firebase-messaging-where-to-get-server-key">Firebase_AuthorizationPushKey</a> and <strong>pushTopic</strong>. For <strong>pushType</strong> enter <strong>firebase</strong>. Done</p>]]>
            </summary>
                                    <updated>2019-01-29T10:25:24+00:00</updated>
        </entry>
            <entry>
            <title><![CDATA[Deployment]]></title>
            <link rel="alternate" href="https://mobidonia.support-hub.io/articles/deployment" />
            <id>https://mobidonia.support-hub.io/264</id>
            <author>
                <name><![CDATA[Dimitar Mojsoski]]></name>
            </author>
            <summary type="html">
                <![CDATA[<h2>Step 1: Publish your panel </h2>
<p>This project is based on <strong>Create React App</strong>. So you can follow the instruction <a href="https://github.com/facebookincubator/create-react-app/blob/master/packages/react-scripts/template/README.md#deployment">here</a> to build your project. All you have to di in fact is to run</p><p><b>IMPORTANT: THIS COMMAND IS REQUIRED IN BOTH CASES</b></p>
<pre><code>npm run build</code></pre>
<p>This will compile your code, and make a <strong>build</strong> folder that is ready for uploading on Firebase or on your own HTTP server.</p>
<h3>Option 1: Deploy on Firebase.</h3>
<p>Go in your firebase console, and then go in <strong>Hosting</strong>. Click on <strong>Get started</strong>. Next, run the command to install the Firebase tools globally in your system.</p>
<pre><code>npm install -g firebase-tools</code></pre>
<p>Next, run the command to login in Firebase (Insrtuctions on firebase console).</p>
<pre><code>firebase login</code></pre>
<p>In your project root, run the command to initialize your firebase project.</p>
<pre><code>firebase init</code></pre>
<p>In the options, select "Hosting" using the <strong>Space</strong> button on your keyboard. The selection should become green. Next select your project. For public folder enter <strong>build</strong>. On Configure as a single-page app enter <strong>y</strong>. Enter <strong>N</strong> to not overwrite any file. Next run</p>
<pre><code>firebase deploy</code></pre>
<p>and enjoy your site running on supper fast google environment. The console will tell you the link to your admin.</p>
<p>We recommend to watch the video on how to deploy to firebase.</p>
<h3>OPTION 2: Deploy on your own server.</h3><p>After you have done STEP 1, you should see a <b>build</b> folder created.</p><p>You can upload this <b>build</b> folder on any hosting like a normal HTML web page.</p>
<p><a href="http://fireadmin.mobidonia.com/videos.php#crud">View video of Deployment</a></p>]]>
            </summary>
                                    <updated>2019-02-01T08:32:47+00:00</updated>
        </entry>
            <entry>
            <title><![CDATA[Introduction]]></title>
            <link rel="alternate" href="https://mobidonia.support-hub.io/articles/getting-started" />
            <id>https://mobidonia.support-hub.io/257</id>
            <author>
                <name><![CDATA[Dimitar Mojsoski]]></name>
            </author>
            <summary type="html">
                <![CDATA[<h2>How you will be able to make template switch<br /></h2>
<p>We have created few components and views that are used throught this project.
They are template independed. So implmenting any bootstrap template should be relativly easy now.
This guide purpose is just that, to gude you in the process of implementing new template.</p>
<h2>What bootstrap admin templates I can use</h2>
<p>You can use any bootstrap admin template. But we recomend one that has the following pagaes / features.</p>
<ul><li>Login / Register page</li>
<li>Blank Page</li>
<li>Has Side menu navigation ( most do )</li>
<li>Has form wizzard / tabs</li>
<li>Tiles</li>
</ul>]]>
            </summary>
                                    <updated>2019-02-06T10:37:43+00:00</updated>
        </entry>
            <entry>
            <title><![CDATA[Demo - Admin panel demo]]></title>
            <link rel="alternate" href="https://mobidonia.support-hub.io/articles/demo" />
            <id>https://mobidonia.support-hub.io/265</id>
            <author>
                <name><![CDATA[Dimitar Mojsoski]]></name>
            </author>
            <summary type="html">
                <![CDATA[<h2>Admin panel demo</h2>
<p><a href="https://tester-8e38d.firebaseapp.com/">DEMO</a></p>
<p>Username: <strong>admin@admin.com</strong> Password: <strong>password</strong></p>
<p>In the demo we have disabled the delete and insert function</p>]]>
            </summary>
                                    <updated>2019-01-29T10:25:24+00:00</updated>
        </entry>
            <entry>
            <title><![CDATA[Add Template Files]]></title>
            <link rel="alternate" href="https://mobidonia.support-hub.io/articles/add-template-files" />
            <id>https://mobidonia.support-hub.io/256</id>
            <author>
                <name><![CDATA[Dimitar Mojsoski]]></name>
            </author>
            <summary type="html">
                <![CDATA[<h2>Prepare for adding new files<br /></h2>
<p>In the project, you will find the folder <strong>public</strong>. This is the folder that contains the default template.
Rename it to <strong>public_md</strong>. We will not use this folder anymore.</p>
<p>There is another folder <strong>public_example</strong>. Make new copy of that folder and rename it to <strong>public</strong>.
This will be our new public folder.</p>
<p>In the folder you copied, there are one .css and one .js file we use cross template. You can modify the values and functions of them to suit your need.</p>
<p>This is how the folder structure should look now.</p><p><img src="https://support-hub--assets.s3.eu-west-2.amazonaws.com/assets/74/images/kGeWa7bntgcB9CgsyFvIf59oRYB0XkKvAZ8pOIb4.png" alt="kGeWa7bntgcB9CgsyFvIf59oRYB0XkKvAZ8pOIb4.png" style="width:50%;" /><br /></p>
<h2>Download and place your files</h2>
<p>Download your HTML Admin Bootstrap template. If zipped, extract it.
Most of the HTML admin templates contain <strong>asssets</strong> folder that contains all the image + js + css.
Copy the <strong>asssets</strong> folder ( or similar ) and put in in the <strong>public</strong> folder.</p>
<p>Most HTML templates have blank.html (If there is no blank.html use index.html file). Put it in the same <strong>public</strong> folder. Rename blank.html to index.html</p>
<p>This is how the folder structure of the public folder should look now.</p><p><img src="https://support-hub--assets.s3.eu-west-2.amazonaws.com/assets/74/images/Fv4RPRDV2ntSCD9scCdyDTrfHOipX3z4kKCFAvGo.png" alt="Fv4RPRDV2ntSCD9scCdyDTrfHOipX3z4kKCFAvGo.png" style="width:50%;" /><br /></p>
<h2>Set up index.htm</h2>
<p>Open the index.html you just copied from your template.
Change the title atribute to match your needs.</p>
<p>Delete everithing that is inside the <strong>body</strong> tag.
In some admin panels, javascirp is loaded at the end of the body tag. Don't remove the Javascript library imports.</p>
<p><strong>Step 1.</strong> Inside the body tag, add the folowing div element</p>
<pre><code> &lt;div id="root"&gt;&lt;/div&gt;</code></pre>
<p><strong>Step 2.</strong> In the <code>&lt;head&gt;...&lt;/head&gt;</code> section add the folowing css import</p>
<pre><code>&lt;link rel="stylesheet" href="assets_vendor/css/fireadmin.css"&gt;
&lt;link href="https://fonts.googleapis.com/icon?family=Material+Icons" rel="stylesheet"&gt;</code></pre>
<p><strong>Step 3.</strong> On the bottom of the HTML code just before closing the html with <code>&lt;/html&gt;</code> add the folowing</p>
<pre><code>&lt;script src="assets_vendor/vendors/js/noty/noty.min.js"&gt;&lt;/script&gt;
    &lt;script src="assets_vendor/js/interface.js"&gt;&lt;/script&gt;
    &lt;script type="text/javascript"&gt;
        function getReactInterfaceToJS(){
        return reactInterfaceToJS;
      }
    &lt;/script&gt;</code></pre>]]>
            </summary>
                                    <updated>2019-02-06T10:37:55+00:00</updated>
        </entry>
            <entry>
            <title><![CDATA[Demo - Purchase]]></title>
            <link rel="alternate" href="https://mobidonia.support-hub.io/articles/purchase" />
            <id>https://mobidonia.support-hub.io/266</id>
            <author>
                <name><![CDATA[Dimitar Mojsoski]]></name>
            </author>
            <summary type="html">
                <![CDATA[<h2>Purchase now </h2>
<p><a href="https://codecanyon.net/item/fireadmin-firebase-dynamic-admin-panel/19063547">Click here to see our products</a></p>]]>
            </summary>
                                    <updated>2019-01-29T10:25:24+00:00</updated>
        </entry>
            <entry>
            <title><![CDATA[Ui Components]]></title>
            <link rel="alternate" href="https://mobidonia.support-hub.io/articles/ui-components" />
            <id>https://mobidonia.support-hub.io/259</id>
            <author>
                <name><![CDATA[Dimitar Mojsoski]]></name>
            </author>
            <summary type="html">
                <![CDATA[<h2>Compoennts this project uses<br /></h2>
<p>We have create few components that are used in the project and that look different in each template</p>
<p><strong>Complex Components</strong></p>
<ul><li><a href="/template-change/login/">Login</a> - Login UI</li>
<li>Master - The Master view (side navigation with central content part)</li>
<li>NavBar - Navigation bar that displays breadcrumbs and actions</li>
</ul><p><strong>Simple Components</strong></p>
<ul><li>Card - A bootstrap card view</li>
<li>Pager  - The paging compoent that is used to paginate your data</li>
<li>Tile - Bootstrap tile component</li>
<li>Wizzard - Wizzard view ( buttons on top of card that control the current content)</li>
</ul><h2>Create new components UI</h2>
<p>In the project, you will find the folder `src\ui\template' that contains the template UI look for the listed components above.
So rename that folder to <strong>template_md</strong> ( or anything else ). We will not need it anymore.</p>
<p>There is folder <code>src\ui\starter\</code>. Copy and rename that folder to <strong>template</strong>. This will be our new working folder for our template specific code.</p>
<p>Now your folder structure should look like this</p><p><img src="https://support-hub--assets.s3.eu-west-2.amazonaws.com/assets/74/images/vhUJUiTcLlWl1wUgkgPUNNqT27bEP8meUkqk3WyZ.png" alt="vhUJUiTcLlWl1wUgkgPUNNqT27bEP8meUkqk3WyZ.png" /><br /></p>]]>
            </summary>
                                    <updated>2019-02-06T10:38:06+00:00</updated>
        </entry>
            <entry>
            <title><![CDATA[Login]]></title>
            <link rel="alternate" href="https://mobidonia.support-hub.io/articles/login" />
            <id>https://mobidonia.support-hub.io/258</id>
            <author>
                <name><![CDATA[Dimitar Mojsoski]]></name>
            </author>
            <summary type="html">
                <![CDATA[<h2>Copy the Login HTML<br /></h2>
<p>Your HTML admin template should have a login.html or named similary, HTML page that is used fore login.
Open that html file, and copy all the content inside the <code>body</code> tag.</p>
<p>Then head over to <a href="https://magic.reactjs.net/htmltojsx.htm">HTMLtoJSX</a> to convert the plain HTML to format suitable for react. Uncheck Create class. Paste your copied HTML inside <strong>Live HTML Editor</strong> tab.</p>
<p>Copy the generated ouput.</p>
<p>In <code>src\ui\tempate\Login.js</code> look for the <code>render</code> function.
Replace the returned <code>&lt;div &gt;...&lt;/div&gt;</code> with the ouput you got from HTMLtoJSX</p>
<h2>Assign the functions</h2>
<p>The copied Login.js comes with some functions.
And you need to assign thous functions to the current UI</p>
<h3>Form on submit</h3>
<p>In the code you just paste, find the <code>&lt;form&gt;</code> tag. Change his <strong>onSubmitEvent</strong>.
It should look like this</p>
<pre><code>&lt;form onSubmit={this.handleSubmit}&gt;</code></pre>
<h3>Email and Password on Change events</h3>
<p>Your Email filed should have the <strong>onChange</strong> and <strong>value</strong> set.
Should look like this (don't replace className)</p>
<pre><code>&lt;input type="email" value={this.state.username} onChange={this.handleChangeUsername} className="form-control" /&gt;</code></pre>
<p>Your Password filed should have the <strong>onChange</strong> and <strong>value</strong> set.
Should look like this (don't replace className)</p>
<pre><code>&lt;input type="password" value={this.state.password} onChange={this.handleChangePassword} className="form-control" /&gt;</code></pre>
<h3>Error Display</h3>
<p>At appropriate location in your HTML, you should add the error display blog. So you can inform user of any Authentication error.</p>
<pre><code>&lt;h4&gt;{this.props.error}&lt;/h4&gt;</code></pre>
<h3>Google Login</h3>
<p>To display the Google login button, add the following code</p>
<pre><code>{this.props.showGoogleLogin()}</code></pre>]]>
            </summary>
                                    <updated>2019-02-06T10:38:24+00:00</updated>
        </entry>
            <entry>
            <title><![CDATA[Windows Requirements]]></title>
            <link rel="alternate" href="https://mobidonia.support-hub.io/articles/window-requiriments" />
            <id>https://mobidonia.support-hub.io/221</id>
            <author>
                <name><![CDATA[Daniel Dimov]]></name>
            </author>
            <summary type="html">
                <![CDATA[<h2>Which Version Do You Need?
</h2>Unfortunately, there was a significant update to Python several years ago that created a big split between Python versions. This can make things a bit confusing to newcomers, but don’t worry. We’ll walk you through installing both major versions. When you visit the <a href="https://www.python.org/downloads/windows/" target="_blank" rel="noreferrer noopener">Python for Windows download page</a>, you’ll immediately see the division. Right at the top, square and center, the repository asks if you want the latest release of Python 2 or Python 3.<img src="https://support-hub--assets.s3.eu-west-2.amazonaws.com/assets/74/images/UuyY1teQZmDkYam68oQLn8HLoOxYBlCMj03d130q.png" alt="UuyY1teQZmDkYam68oQLn8HLoOxYBlCMj03d130q.png" />
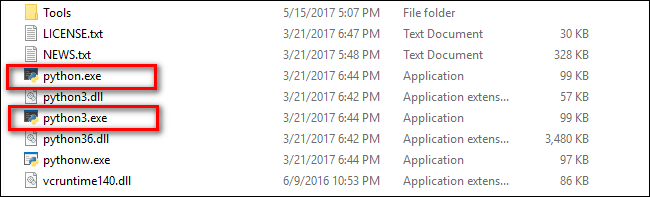
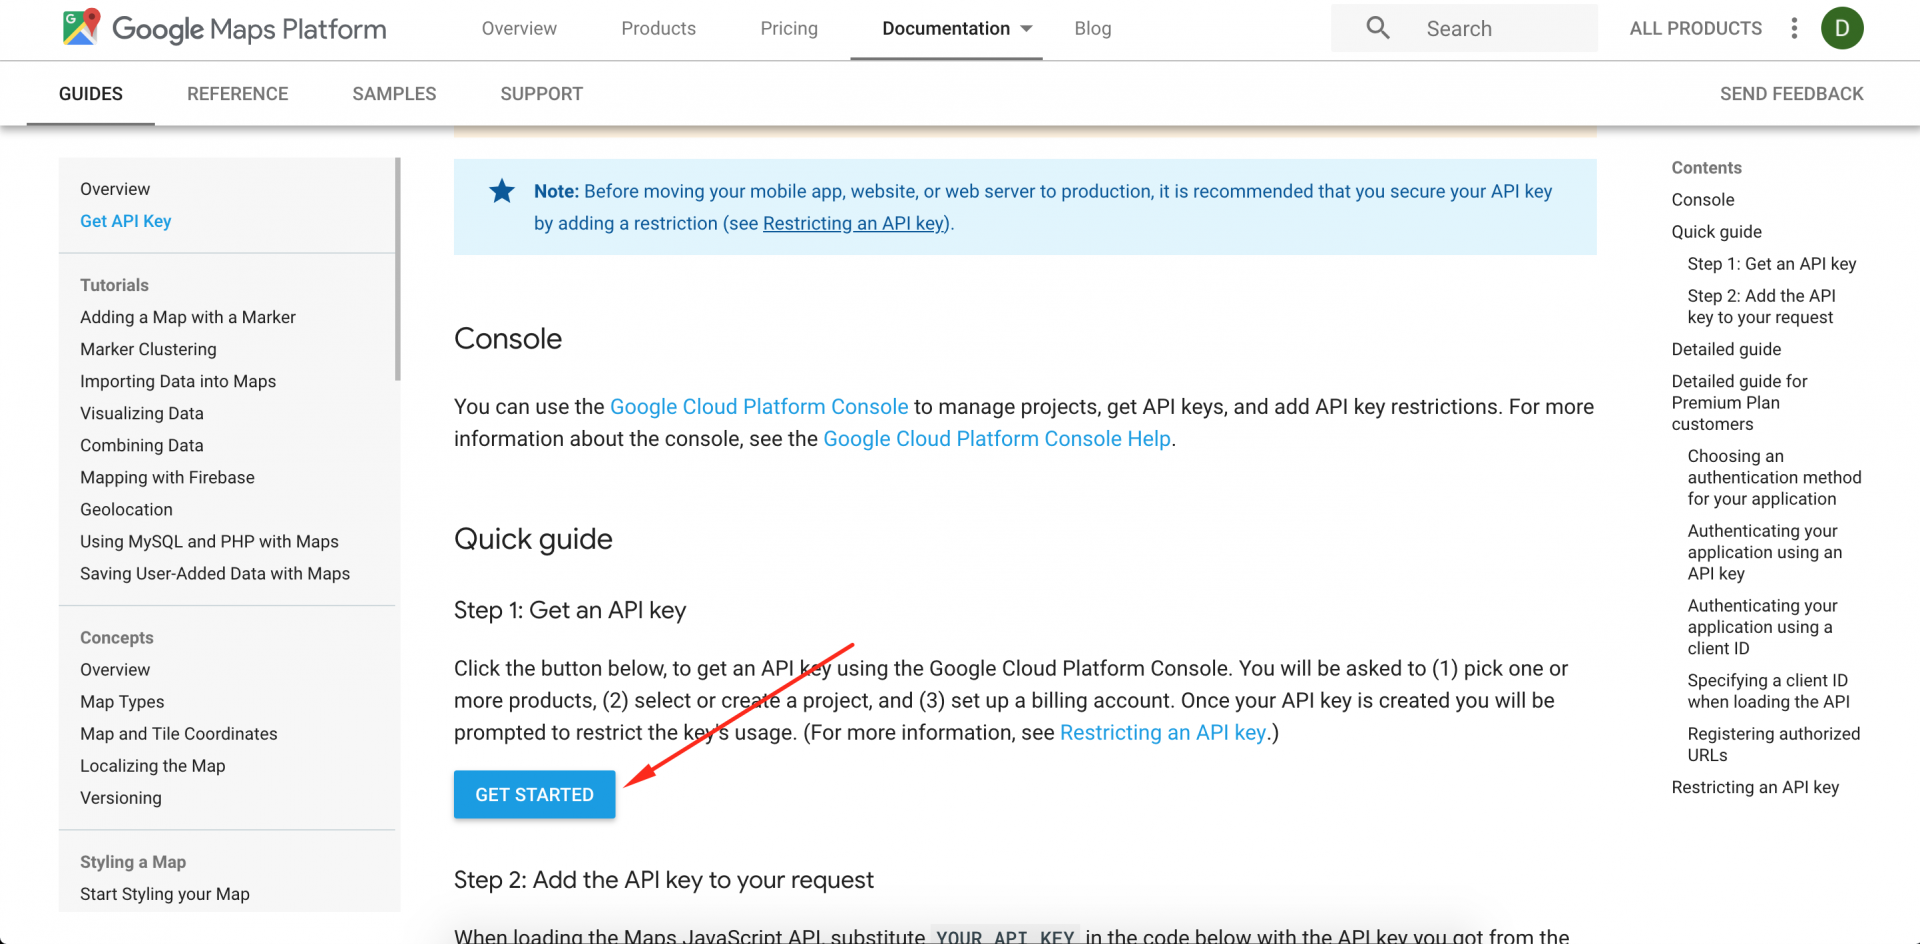
You can download just Python 2 or Python 3 if you’re sure you only need a particular version. We’re going the distance today and will be installing both of them, so we recommend you download both versions and do the same. Under the main entry for both versions you’ll see an “x86-64” installer, as seen below.<img src="https://support-hub--assets.s3.eu-west-2.amazonaws.com/assets/74/images/EiAwOef0sTyK30b3mhvUE7fsSgLvnDV1nStCBnc0.png" alt="EiAwOef0sTyK30b3mhvUE7fsSgLvnDV1nStCBnc0.png" /><br /><h2>Python installation</h2><p>If you want to learn the newest version of Python, you’ll need to install Python 3. You can install it alongside Python 2.7 with no problems, so go ahead and <a href="https://www.python.org/downloads/windows/" target="_blank" rel="noreferrer noopener">download and run the installer</a> now.</p><p>On the first screen, enable the “Add Python 3.6 to PATH” option and then click “Install Now.”</p><p><img src="https://support-hub--assets.s3.eu-west-2.amazonaws.com/assets/74/images/Izona8zxG6yey5vRpBBOtzXb0BnTJabgd09OTncX.png" alt="Izona8zxG6yey5vRpBBOtzXb0BnTJabgd09OTncX.png" /></p><p>Next, you have a decision to make. Clicking the “Disable path length limit” option removes the limitation on the MAX_PATH variable. This change won’t break anything, but will allow Python to use long path names. Since many Python programmers are working in Linux and other *nix systems where path name length isn’t an issue, turning this on in advance can help smooth over any path-related issues you might have while working in Windows.</p><p><img src="https://support-hub--assets.s3.eu-west-2.amazonaws.com/assets/74/images/yx9EXyUy7xpq2MvquCHeJRVgEk36UXiyHeAG9zL7.png" alt="yx9EXyUy7xpq2MvquCHeJRVgEk36UXiyHeAG9zL7.png" /><br /></p><p>If you’re only installing Python 3, you can use the same command line trick of typing </p><pre>python -v</pre><p>that we used above to check that it is installed correctly and the path variable is set. If you’re installing both versions, however, you need to make the quick tweak found in the following section.</p><p><br /></p><h3>Adjust System Variables So You Can Access Both Python Versions From the Command Line</h3><p>This section of the tutorial is completely optional, but will allow you to quickly access both versions of Python from the command line. After installing both versions of Python, you may have noticed a little quirk. Even though we enabled the system path for both Python installations, typing “python” at the command prompt only points you to Python 2.7. <br /></p><p>
The reason for this is simple: the variable (whether automatically adjusted by an installer or manually tweaked) simply points at a directory, and every executable in that directory becomes a command line command. If there are two directories listed and both have a “<b>python.exe</b>” file in them, whichever directory is higher in the list of variables gets used. And, if there is a variable set for the system and the user, the system path takes precedence over the user path. </p><p>
The latter is exactly what’s happening in this case: the Python 2 installer edited the system wide variable and the Python 3 installer added a user level variable—and we can confirm this by looking at the Windows’ environment variables. </p><p>
Hit Start, type “advanced system settings,” and then select the “View advanced system settings” option. In the “System Properties” window that opens, on the “Advanced” tab, click the “Environment Variables” button.</p><p><img src="https://support-hub--assets.s3.eu-west-2.amazonaws.com/assets/74/images/DhZA4TlRxDGDdrrsVJ4GNP9J8weLlKZMBkFv3SHw.png" alt="DhZA4TlRxDGDdrrsVJ4GNP9J8weLlKZMBkFv3SHw.png" />
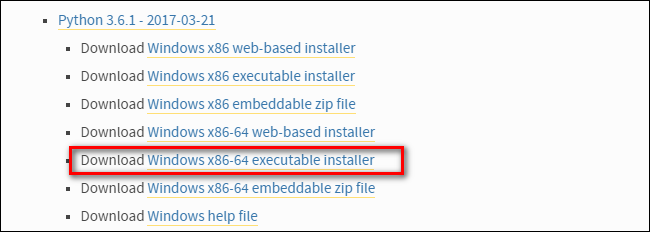
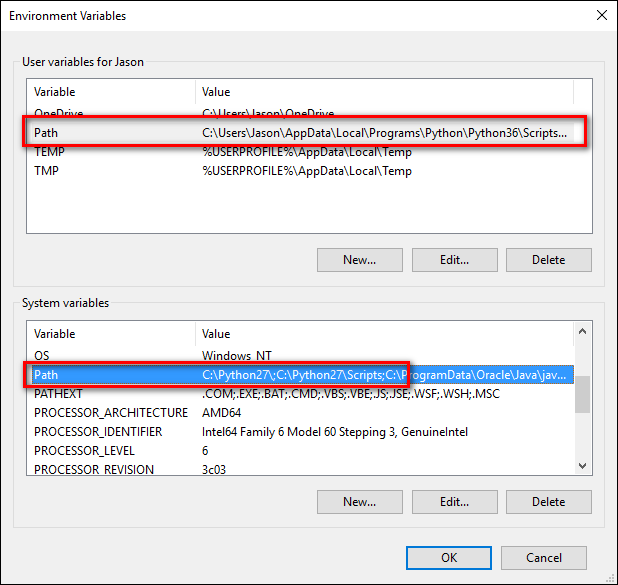
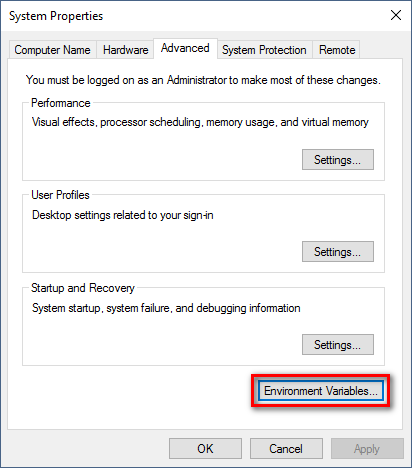
Here, you can see Python 3 listed in the “User variables” section and Python 2 listed in the “System variables” section.</p><p><img src="https://support-hub--assets.s3.eu-west-2.amazonaws.com/assets/74/images/9u7xCyZ41eDDk8sbA98BIxQuaDAxi7WVKbzWmFrX.png" alt="9u7xCyZ41eDDk8sbA98BIxQuaDAxi7WVKbzWmFrX.png" /></p><p>There are a few ways you can remedy this situation. The simplest (albeit the one with the least functionality) is to just remove the entry for the version of Python you plan on using the least. While that’s simple, it’s also not very much fun. Instead we can make another change that will give us access to “python” for Python 2 and “python3” for Python 3.
</p><p>
</p><p>To do this, fire up File Manager and head to the folder where you installed Python 3</p><p><i> (C:\Users\[username]\AppData\Local\Programs\Python\Python36 by default). </i></p><p>Make a copy of the “python.exe” file, and rename that copy (not the original) to “python3.exe”.</p><p><img src="https://support-hub--assets.s3.eu-west-2.amazonaws.com/assets/74/images/U9CDK7wINcT8m6J193kVjz2XKkVww2wtQWGPbvDe.png" alt="U9CDK7wINcT8m6J193kVjz2XKkVww2wtQWGPbvDe.png" /></p><p>Open a new command prompt (the environmental variables refresh with each new command prompt you open), and type “python3 –version”.</p><p><img src="https://support-hub--assets.s3.eu-west-2.amazonaws.com/assets/74/images/fjrE00JB2m8fKIRlpuY10UFWqp64B2dpeCbvpSlZ.png" alt="fjrE00JB2m8fKIRlpuY10UFWqp64B2dpeCbvpSlZ.png" /></p><p>Boom! You can now use the “python” command at the Command Prompt when you want to use Python 2.7 and the “python3” command when you want to use Python 3.</p><p><br /></p>]]>
            </summary>
                                    <updated>2019-01-29T10:19:02+00:00</updated>
        </entry>
            <entry>
            <title><![CDATA[Video documentation]]></title>
            <link rel="alternate" href="https://mobidonia.support-hub.io/articles/video-documentation" />
            <id>https://mobidonia.support-hub.io/298</id>
            <author>
                <name><![CDATA[Daniel Dimov]]></name>
            </author>
            <summary type="html">
                <![CDATA[<div class="row">					<div class="col-md-12">						 						 						<div class="category-info">							<h3>Installation 								 								<a href="#installation"> 									<i></i> 								</a> 								 							</h3>						</div>						 						<div class="row">							<div class="col-md-3">								 								<div class="box box-image">									<a href="https://www.youtube.com/watch?v=yCXySJIWiE8&amp;list=PLz2b4Av5NWchoQ66IRXnDvOOaNDvnTurv" target="_blank" rel="noreferrer noopener"><img src="http://img.youtube.com/vi/yCXySJIWiE8/0.jpg" class="image" alt="box image" /></a> 									<h4>Download &amp; install</h4>									<p class="box-description">Run local instance of your brand new Firebase Admin.</p>								</div>								 							</div>							<div class="col-md-3">								 								<div class="box box-image">									<a href="https://www.youtube.com/watch?v=WuPmFC-lF5g&amp;list=PLz2b4Av5NWchoQ66IRXnDvOOaNDvnTurv" target="_blank" rel="noreferrer noopener"><img src="http://img.youtube.com/vi/WuPmFC-lF5g/0.jpg" class="image" alt="box image" /></a> 									<h4>Connect to Firebase</h4>									<p class="box-description">Learn how to connect to your Firebase instance.</p>								</div>								 							</div>							<div class="col-md-3">								 								<div class="box box-image">									<a href="https://www.youtube.com/watch?v=rJU2pkls4yA&amp;list=PLz2b4Av5NWchoQ66IRXnDvOOaNDvnTurv" target="_blank" rel="noreferrer noopener"><img src="http://img.youtube.com/vi/rJU2pkls4yA/0.jpg" class="image" alt="box image" /></a> 									<h4>Navigation</h4>									<p class="box-description">Set up the menu of your admin panel.</p>								</div>								 							</div>							<div class="col-md-3">								 								<div class="box box-image">									<a href="https://www.youtube.com/watch?v=dEkrW2qze7o&amp;list=PLz2b4Av5NWchoQ66IRXnDvOOaNDvnTurv" target="_blank" rel="noreferrer noopener"><img src="http://img.youtube.com/vi/dEkrW2qze7o/0.jpg" class="image" alt="box image" /></a> 									<h4>Firebase Schema Setup</h4>									<p class="box-description">Create your schema so you can add data in Firebase.</p>								</div>								 							</div>							<div class="col-md-3">								 								<div class="box box-image">									<a href="https://www.youtube.com/watch?v=FebFdrDMtlc&amp;t=4s&amp;list=PLz2b4Av5NWchoQ66IRXnDvOOaNDvnTurv" target="_blank" rel="noreferrer noopener"><img src="http://img.youtube.com/vi/FebFdrDMtlc/0.jpg" class="image" alt="box image" /></a> 									<h4>Firestore Schema Setup</h4>									<p class="box-description">Create your schema so you can add data in Firestore.</p>								</div>								 							</div>							<div class="col-md-3">								 								<div class="box box-image">									<a href="https://www.youtube.com/watch?v=2Sd5xLeRJ5c&amp;list=PLz2b4Av5NWchoQ66IRXnDvOOaNDvnTurv" target="_blank" rel="noreferrer noopener"><img src="http://img.youtube.com/vi/2Sd5xLeRJ5c/0.jpg" class="image" alt="box image" /></a> 									<h4>Fields Setup</h4>									<p class="box-description">Display dropdowns, checkboxes, radios, images.</p>								</div>								 							</div>						</div>					</div>				</div>
<div class="row">					<div class="col-md-23">						 						<div class="category-info">							<h3>CRUD 								 								<a href="#crud"> 									<i></i> 								</a> 								 							</h3>						</div>						 						<div class="row">							<div class="col-md-3">								 								<div class="box box-image">									<a href="https://www.youtube.com/watch?v=tzFfdBrDH2Q&amp;list=PLz2b4Av5NWchoQ66IRXnDvOOaNDvnTurv" target="_blank" rel="noreferrer noopener"><img src="http://img.youtube.com/vi/tzFfdBrDH2Q/0.jpg" class="image" alt="box image" /></a> 									<h4>Create</h4>									<p class="box-description">Add new fields, items in your data structure.</p>								</div>								 							</div>							<div class="col-md-3">								 								<div class="box box-image">									<a href="https://www.youtube.com/watch?v=1CYYrYALQ-w&amp;list=PLz2b4Av5NWchoQ66IRXnDvOOaNDvnTurv" target="_blank" rel="noreferrer noopener"><img src="http://img.youtube.com/vi/1CYYrYALQ-w/0.jpg" class="image" alt="box image" /></a> 									<h4>Read</h4>									<p class="box-description">Ways of displaying your data. Element, Arrays, Values.</p>								</div>								 							</div>							<div class="col-md-3">								 								 								<div class="box box-image">									<a href="https://www.youtube.com/watch?v=1onyAE55J74&amp;index=8&amp;list=PLz2b4Av5NWchoQ66IRXnDvOOaNDvnTurv" target="_blank" rel="noreferrer noopener"><img src="http://img.youtube.com/vi/1onyAE55J74/0.jpg" class="image" alt="box image" /></a> 									<h4>Update</h4>									<p class="box-description">Update any filds.</p>								</div>								 							</div>							<div class="col-md-3">								 								<div class="box box-image">									<a href="https://www.youtube.com/watch?v=wuXaXFAoyeY&amp;index=9&amp;list=PLz2b4Av5NWchoQ66IRXnDvOOaNDvnTurv" target="_blank" rel="noreferrer noopener"><img src="http://img.youtube.com/vi/wuXaXFAoyeY/0.jpg" class="image" alt="box image" /></a> 									<h4>Delete</h4>									<p class="box-description">Delete single element or complete element at once.</p>								</div>								 							</div>							<div class="col-md-3">								 								<div class="box box-image">									<a href="https://www.youtube.com/watch?v=rVFqLBOcza4&amp;list=PLz2b4Av5NWchoQ66IRXnDvOOaNDvnTurv" target="_blank" rel="noreferrer noopener"><img src="http://img.youtube.com/vi/rVFqLBOcza4/0.jpg" class="image" alt="box image" /></a> 									<h4>Firebase References</h4>									<p class="box-description">Learn how to set up references in Firebase DB.</p>								</div>								 							</div>							<div class="col-md-3">								 								<div class="box box-image">									<a href="https://www.youtube.com/watch?v=aNN8VUppBnY&amp;index=9&amp;list=PLz2b4Av5NWchoQ66IRXnDvOOaNDvnTurv" target="_blank" rel="noreferrer noopener"><img src="http://img.youtube.com/vi/aNN8VUppBnY/0.jpg" class="image" alt="box image" /></a> 									<h4>Firestore References</h4>									<p class="box-description">Learn how to set up references in Firestore DB.</p>								</div>								 							</div>						</div>				</div>				<div class="row">					<div class="col-md-23">						 						<div class="category-info">							<h3>Authorization 								 								<a href="#appereances"> 									<i></i> 								</a> 								 							</h3>						</div>						 						<div class="row">							<div class="col-md-3">								 								<div class="box box-image">									<a href="https://www.youtube.com/watch?v=R9m6r9v6KYw&amp;index=10&amp;list=PLz2b4Av5NWchoQ66IRXnDvOOaNDvnTurv" target="_blank" rel="noreferrer noopener"><img src="http://img.youtube.com/vi/R9m6r9v6KYw/0.jpg" class="image" alt="box image" /></a> 									<h4>Allowed user</h4>									<p class="box-description">Manage who can use the admin panel.</p>								</div>								 							</div>						</div>					</div>				</div>				<div class="row">					<div class="col-md-23">						 						<div class="category-info">							<h3>Appereances 								 								<a href="#appereances"> 									<i></i> 								</a> 								 							</h3>						</div>						 						<div class="row">							<div class="col-md-3">								 								<div class="box box-image">								 									<a href="https://www.youtube.com/watch?v=4ESEbI48HPY&amp;index=11&amp;list=PLz2b4Av5NWchoQ66IRXnDvOOaNDvnTurv" target="_blank" rel="noreferrer noopener"><img src="http://img.youtube.com/vi/4ESEbI48HPY/0.jpg" class="image" alt="box image" /></a> 									<h4>Change existing theme</h4>									<p class="box-description">Modify the look and feel of your admin panel.</p>								</div>								 							</div>							<div class="col-md-3">								 								<div class="box box-image">									<a href="https://www.youtube.com/watch?v=6sdWm_u03XQ&amp;t=1s&amp;index=12&amp;list=PLz2b4Av5NWchoQ66IRXnDvOOaNDvnTurv" target="_blank" rel="noreferrer noopener"><img src="http://img.youtube.com/vi/6sdWm_u03XQ/0.jpg" class="image" alt="box image" /></a> 									<h4>Use new bootstrap template</h4>									<p class="box-description">Replace complete template with a new template.</p>								</div>								 							</div>							 						</div>					</div>				</div>				<div class="row">					<div class="col-md-23">						 						<div class="category-info">							<h3>Publish 								 								<a href="#publish"> 									<i></i> 								</a> 								 							</h3>						</div>						 						<div class="row">							<div class="col-md-3">								 								<div class="box box-image">									<a href="https://www.youtube.com/watch?v=Xy-9gHS_cIA&amp;index=13&amp;list=PLz2b4Av5NWchoQ66IRXnDvOOaNDvnTurv" target="_blank" rel="noreferrer noopener"><img src="http://img.youtube.com/vi/Xy-9gHS_cIA/0.jpg" class="image" alt="box image" /></a> 									<h4>Publish on Firebase</h4>									<p class="box-description">Run the admin directly in your firebase.</p>								</div>								 							</div>							<div class="col-md-3">								 								<div class="box box-image">									<a href="https://www.youtube.com/watch?v=3sUwCB3t-_M&amp;t=1s&amp;index=14&amp;list=PLz2b4Av5NWchoQ66IRXnDvOOaNDvnTurv" target="_blank" rel="noreferrer noopener"><img src="http://img.youtube.com/vi/3sUwCB3t-_M/0.jpg" class="image" alt="box image" /></a> 									<h4>Publish on own server</h4>									<p class="box-description">Publish the admin panel on your own server.</p>								</div>								 							</div>						</div>					</div>				</div>			</div>]]>
            </summary>
                                    <updated>2019-01-29T12:34:21+00:00</updated>
        </entry>
            <entry>
            <title><![CDATA[Change log]]></title>
            <link rel="alternate" href="https://mobidonia.support-hub.io/articles/change-log" />
            <id>https://mobidonia.support-hub.io/299</id>
            <author>
                <name><![CDATA[Daniel Dimov]]></name>
            </author>
            <summary type="html">
                <![CDATA[<h5><b>Version 10.3 - 26 Feb 2019</b></h5><div><b>Bug Fixes</b></div><div><b>- </b>showSearchInTables working for React tables</div><p><b><br /></b></p><h5><b>Version 10.2 - 07 Feb 2019</b><br /></h5><div><b>Bug Fixes</b></div><div>- Fixed Firestore React Tables</div><p class="dropdown-item"><b><br /></b></p><h5><b>Version 10.1 - 05 Feb 2019</b></h5><p><b>Bug Fixes</b></p><div>- Fixed delete now working in React Tables<br /></div><p class="dropdown-item"><b><br /></b></p><h5><b>Version 10.0 - 29 Jan 2019</b></h5><p><b>New Features</b></p><ol><li> React Tables included</li><li> Password reset</li><li>User Registration</li><li>User profile setup</li><li>Change the template of the FireAdmin</li></ol><p><br /></p><p><b>Bug Fixes</b></p><p>- Paginator module install error</p><p><br /></p><p><b>Upgrade guide</b></p><p>This is a major release. We suggest to download the source code, follow the installation guide. </p><p>You can reuse your old schema.json, firestoreschema.js, and app.js. </p><p><br /></p><p><br /></p><p>Older Changelog can be found at</p><p><a href="http://fireadmin.mobidonia.com/changelog.php">http://fireadmin.mobidonia.com/changelog.php</a></p><p><br /></p>]]>
            </summary>
                                    <updated>2019-02-26T10:53:01+00:00</updated>
        </entry>
            <entry>
            <title><![CDATA[Revert to DataTables]]></title>
            <link rel="alternate" href="https://mobidonia.support-hub.io/articles/revert-to-datatables" />
            <id>https://mobidonia.support-hub.io/308</id>
            <author>
                <name><![CDATA[Daniel Dimov]]></name>
            </author>
            <summary type="html">
                <![CDATA[<p>In version 10.0 we have implemented <a href="https://github.com/tannerlinsley/react-table" target="_blank" rel="noreferrer noopener">React Tables</a>. </p><p>But since there are a lot of use cases of use, there can be some that we haven't tested and that makes a problem for you. </p><p>We will continue to improve our implementation of React Tables. </p><p><br /></p><p>But just as a temporary fix,  you can switch to the old DataTables easily. </p><p>In both </p><p><b>src/container/Fireadmin.js </b></p><p>and</p><p><b>src/containers/Firestoreadmin.js</b></p><p>at the start of the code replace the table import with the old tables</p><pre>import Table from  '../components/tables/RTable.js'</pre><p>into</p><pre>import Table from  '../components/tables/Table.js'</pre>]]>
            </summary>
                                    <updated>2019-02-06T09:44:33+00:00</updated>
        </entry>
            <entry>
            <title><![CDATA[Obtain and set Google Maps API key.]]></title>
            <link rel="alternate" href="https://mobidonia.support-hub.io/articles/obtain-and-set-google-maps-api-key" />
            <id>https://mobidonia.support-hub.io/356</id>
            <author>
                <name><![CDATA[Daniel Dimov]]></name>
            </author>
            <summary type="html">
                <![CDATA[<p>In this guide, you will learn how to obtain your Google Maps JavaScript API key.</p><p><br /></p><h3>Obtain API Key</h3><p>Head over to<a href="https://developers.google.com/maps/documentation/javascript/get-api-key" target="_blank" rel="noreferrer noopener"> Google Developers Web Maps JavaScript API </a>to obtain API Key</p><p>Click on the "<b>Get Started</b>" button.</p><p><img src="https://support-hub--assets.s3.eu-west-2.amazonaws.com/assets/74/images/lg3yjypMILvavOX0OjoxF46DhEY5CGTkdEznDqJr.png" style="width:50%;" alt="lg3yjypMILvavOX0OjoxF46DhEY5CGTkdEznDqJr.png" /></p><p><b>Select Maps</b></p><p><img src="https://support-hub--assets.s3.eu-west-2.amazonaws.com/assets/74/images/vCt8SNGR9fqVoT0I45jZr0RvMlzCvgCEEMNjFNhg.png" style="width:50%;" alt="vCt8SNGR9fqVoT0I45jZr0RvMlzCvgCEEMNjFNhg.png" /></p><p>Then Select or create a project. </p><p><img src="https://support-hub--assets.s3.eu-west-2.amazonaws.com/assets/74/images/NzsS4qnxMqNtp9O7TwgZVB9DyHJoTd5cPugawRcn.png" style="width:50%;" alt="NzsS4qnxMqNtp9O7TwgZVB9DyHJoTd5cPugawRcn.png" /></p><p><b>Then set up billing. </b></p><p>In the end, you will get the<b> API KEY. </b></p><p><b>Important: </b>When you get your Google API Key, by default is not protected, it means, it can be used anywhere. </p><p>Make sure you set up the URL where your key will be used. </p><p>Go in <a href="https://console.cloud.google.com/apis/credentials" target="_blank" rel="noreferrer noopener">Google Cloud Platform</a></p><p><img src="https://support-hub--assets.s3.eu-west-2.amazonaws.com/assets/74/images/3tzZGyACBmxvsPpkkKfNlefN5GOPzL0GptWHVsS0.png" style="width:25%;" alt="3tzZGyACBmxvsPpkkKfNlefN5GOPzL0GptWHVsS0.png" /></p><p>Locate the key you have created and enter the url.</p><p><img src="https://support-hub--assets.s3.eu-west-2.amazonaws.com/assets/74/images/HRKTzidioaUpqZ9sbfcvajljXTVgaaGtWajKzE6m.png" style="width:50%;" alt="HRKTzidioaUpqZ9sbfcvajljXTVgaaGtWajKzE6m.png" /></p><p><br /></p><h3>Place your API KEY</h3><p>Now in src/config/app.js around line 30, add your API KEY</p><pre>"googleMapsAPIKey":"YOUR_KEY",</pre><p><br /></p>]]>
            </summary>
                                    <updated>2019-03-12T02:17:12+00:00</updated>
        </entry>
            <entry>
            <title><![CDATA[Navbar]]></title>
            <link rel="alternate" href="https://mobidonia.support-hub.io/articles/navbar" />
            <id>https://mobidonia.support-hub.io/381</id>
            <author>
                <name><![CDATA[Daniel Dimov]]></name>
            </author>
            <summary type="html">
                <![CDATA[<h2>Available props<br /></h2>
<ul><li>{Array} items - the breadcrubs items</li>
<li>{String} current path</li>
<li>{String} title - Title of the current page</li>
</ul><h3>Getting started</h3>
<p>For this change we will work in NavBar.js.
Inside you will see the <strong>render</strong> function and the <strong>generateBreadCrumb</strong>
generateBreadCrumb job will be to display the bredcrumbs. So lets start with that</p>
<h3>Styling the breadcrumbs</h3>
<p>You should already see the breadcrumbs in your page, but the may not look exactly as in yout template demo.
So to make them the same, check how they are organized and styled in your template. In most of the cases they are avialbe in the blank page demo.</p>
<h3>Page title</h3>
<p>One of the avaialbe props in the title of the page. You will already see the title, but maybe the organization is not ok.
So what you can do is to copy the HTML part with the title ( or/and breadcrumbs ) and convert them to JSX syntax <a href="https://magic.reactjs.net/htmltojsx.htm">HTMLtoJSX</a>.</p>
<p>Then replace demo data with the props and calls to functions.</p>]]>
            </summary>
                                    <updated>2019-03-20T13:33:20+00:00</updated>
        </entry>
            <entry>
            <title><![CDATA[Master]]></title>
            <link rel="alternate" href="https://mobidonia.support-hub.io/articles/master" />
            <id>https://mobidonia.support-hub.io/382</id>
            <author>
                <name><![CDATA[Daniel Dimov]]></name>
            </author>
            <summary type="html">
                <![CDATA[<h2>Copy the Master screen<br /></h2>
<p>Your HTML admin template should have a blank.html or named similary, HTML page that is just blank and has the side menu.
Open that html file, and copy all the content from inside the <code>body</code> tag.</p>
<p>Then head over to <a href="https://magic.reactjs.net/htmltojsx.htm">HTMLtoJSX</a> to convert the plain HTML to format suitable for react. Uncheck Create class. Paste your copied HTML inside <strong>Live HTML Editor</strong> tab.</p>
<p>Copy the generated ouput.</p>
<p>In <code>src\ui\tempate\Master.js</code> look for the <code>render</code> function.
Replace the returned <code>&lt;div &gt;...&lt;/div&gt;</code> with the ouput you got from HTMLtoJSX</p><p><br /></p>
<h2>Add the childrens to the view</h2>
<p>The html that you copied over, it should have the content are somewhere.
There add this</p>
<pre><code> {this.props.children}</code></pre>
<p class="dropdown-item"><br /></p><h2>Remove the demo menus and add system</h2>
<p>Find the <code>&lt;ul&gt;...&lt;/ul&gt;</code> list that containst the menu. remove her content and add</p>
<pre><code> {Config.navigation.map(this.props.printMenuItem)}</code></pre>
<p class="dropdown-item"><br /></p><h2>Remove unnececery HTML admin demo elements</h2>
<p>Lot of admin templates will come with extra things that you will not need like search box, notification pop up etc.. Remove them from the master screen.</p>
<p><br /></p><h2>Set user related data</h2>
<p>The master screen has access to few user related props.
Put them in your new master screen.
Use them like this ex.
{this.props.userPhoto}
{this.props.user.DisplayName}</p>
<p>On the logout button, add onClick to call the logout function ex.</p>
<pre><code>&lt;a onClick={this.props.logout}&gt;Logour&lt;/a&gt;</code></pre>
<p><br /></p><h3>Available props</h3>
<ul><li>{String} userPhoto - the user image</li>
<li>{Object} user  - the current logged in user in firebase - Firebase User</li>
<li>{Function} logout - the logout function, no paramas</li>
<li>{Function} printMenuItem - function for priting the menu. Param 1 menu items</li>
</ul><p><br /></p><h2>Remove any content that appear in the content area</h2>
<p>Remove any additional data such as breadcrumbs or titles in the template, since in our case they are comming from the <strong>childer</strong> element that we had incuded.</p>]]>
            </summary>
                                    <updated>2019-03-20T13:33:04+00:00</updated>
        </entry>
            <entry>
            <title><![CDATA[Obtain and set Tiny MCE]]></title>
            <link rel="alternate" href="https://mobidonia.support-hub.io/articles/obtain-and-set-tiny-mce-1294" />
            <id>https://mobidonia.support-hub.io/1294</id>
            <author>
                <name><![CDATA[Dimitar Mojsoski]]></name>
            </author>
            <summary type="html">
                <![CDATA[<p><br /></p><p>In this guide, you will learn how to obtain your Tiny MCE API key.</p><p><span><br /></span></p><h3><span>Create account on Tiny MCE website</span></h3><p><br /></p><p>Open <a href="https://www.tiny.cloud/" target="_blank" rel="noreferrer noopener">Tiny MCE official website</a> and create account. </p><p>When you logged in with your account you will see your dashboard.</p><p><br /></p><p><br /></p><h3><span>Generate Tiny MCE Api Key  </span></h3><p> </p><p>From the menu open <b>API Key Manager </b>and select <b>Access and configure TinyMCE API Key here</b></p><p><img src="https://support-hub--assets.s3.eu-west-2.amazonaws.com/assets/74/images/ct7eO7YCWG6DyxhHuZtXQjUwOPnJRhgguLNdCObi.png" alt="ct7eO7YCWG6DyxhHuZtXQjUwOPnJRhgguLNdCObi.png" /><b><br /></b></p><p>Tiny MCE Api Key will be automatically generated. You only need to copy that key.</p><p><img src="https://support-hub--assets.s3.eu-west-2.amazonaws.com/assets/74/images/yLUqYrQM1Y7nz4Jg0iOYgb9AYyFz3EchquxdcLeL.png" alt="yLUqYrQM1Y7nz4Jg0iOYgb9AYyFz3EchquxdcLeL.png" /></p><p class="dropdown-item"><br /></p><h3>Add your domain</h3><p>After you get your Tiny MCE Api key final step is to add your domain to accept requests.</p><p><img src="https://support-hub--assets.s3.eu-west-2.amazonaws.com/assets/74/images/vvuVrjOpxbHol0oCTEYymgBZAGGWwUvC3tlxcMHj.png" alt="vvuVrjOpxbHol0oCTEYymgBZAGGWwUvC3tlxcMHj.png" /><br /></p>]]>
            </summary>
                                    <updated>2019-09-03T12:41:40+00:00</updated>
        </entry>
    </feed>
